Roger Zimmermann
-
Posts
3,130 -
Joined
-
Last visited
-
Days Won
24
Content Type
Forums
Gallery
Events
Everything posted by Roger Zimmermann
-

Roger's handcrafted 1:12 scale models
Roger Zimmermann replied to Roger Zimmermann's topic in Our Cars & Restoration Projects
No, there is no link or whatever. I did that model between 1966 and 1980 (or later). What I'm showing here is the intend to finish it; indeed to repair and finish it. I have so few pictures on paper and it was done so many years ago, I cannot do a story like I did with the Mark II. -
Roger's handcrafted 1:12 scale models
Roger Zimmermann replied to Roger Zimmermann's topic in Our Cars & Restoration Projects
After I cut some wires to take the window’s harness out, I noticed that it was not coming out easily. Once away from the car, I noticed that I was not able to insert a single wire into the model from the hole in the A pillar! It was at that time evident: the dash must out. But how? Fortunately, I kept the drawings I did during the construction. Unfortunately, they are imprecise; I just found an incomplete description how the dash was installed: the heater and A/C module at the dash was put last and was glued. Fortunately, the glue after so many years is no more very strong: with a plier, I could take the assembly out. Behind that, a screw is attaching the left instruments assembly. When this assembly was out, I saw more screws. But, how to remove the instruments from the right side? My brain had to make some overtime and something told me that one of the radio knobs is the key. But which one? The RH one would not turn but the LH did. And, effectively, the assembly is coming out! After a while, I was convinced that the surround in leather must come out. I found the 3 screws but then, the steering column was in the way! It went out without too much trouble. However, the dash would not move a lot because of the light harness. Then, I saw that the light switch is attached with 2 screws; this allowed me to pull the dash. Fortunately, all went without damage to the paint or plated parts. I can now move to the seat switch; I think I’m doing another one which should be better.


-
Roger's handcrafted 1:12 scale models
Roger Zimmermann replied to Roger Zimmermann's topic in Our Cars & Restoration Projects
Thanks Martin! Yes, since the model is finished, there were a lot of messages. To make things worse, I continue with the repair of another model! -
Roger's handcrafted 1:12 scale models
Roger Zimmermann replied to Roger Zimmermann's topic in Our Cars & Restoration Projects
Yes, it's exactly like that! For the moment it's a mess. Here is an older one. Plus two from right now. I cannot put the camera into the car to have a good one!


-
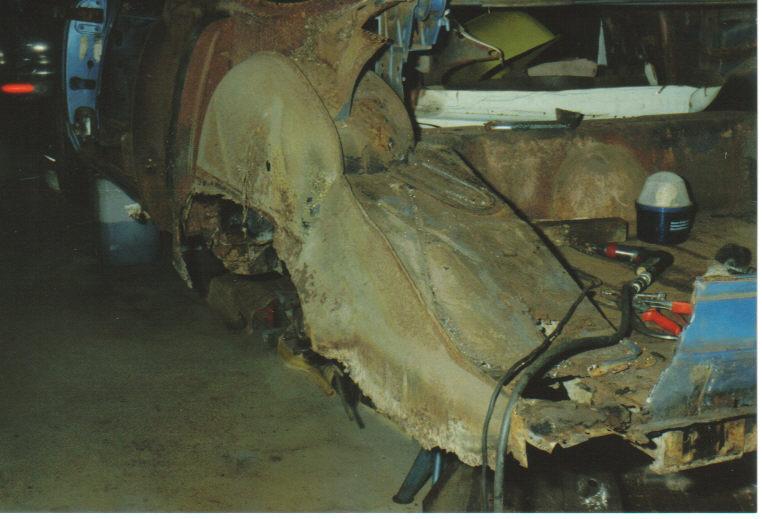
On June 7, 1993, the LH rear fender was removed! During its stay in Virginia the car was the home for at least one animal; I discovered its nest when the fender was gone. I found also a small bone in a rocker panel.

-
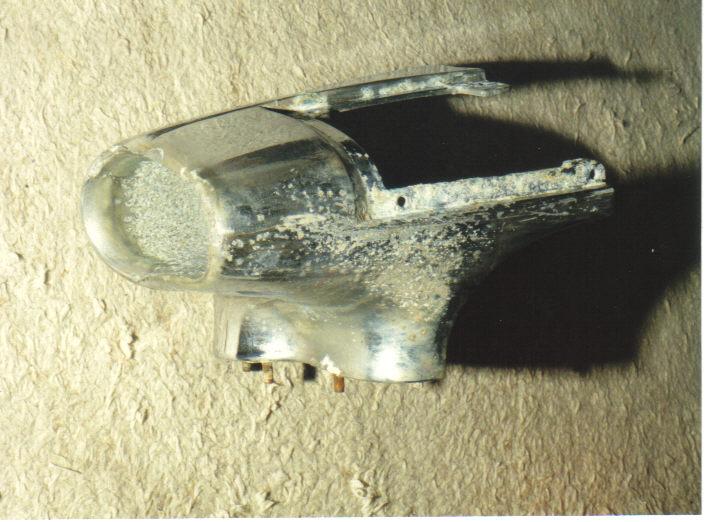
What was the condition of the other parts, moldings, emblems and so on? Well, not better. The rear bumper ends were not complete, the side plate was missing on both sides. They were badly corroded; I could not even remove the screws for the exhaust's insulation plate. By chance, a friend of mine had a restored pair for sale; they are on the car now. I still have the bad ones, if somebody wants them... The vendor promised to deliver a set of 5 Sabre wheel. He did so; of course, the wheels were "well used". A company in Switzerland removed the steel part; I let dechrome the aluminum parts and I began to grind and file the wheels. It's a job I would not do another time: I had about 40 hours to restore the better wheels, per wheel of course. The bad one took about 100 hours. Do you want to know how many spokes each wheel has? 27. You can check that on the picture.

-
Roger's handcrafted 1:12 scale models
Roger Zimmermann replied to Roger Zimmermann's topic in Our Cars & Restoration Projects
As some wiring is lose in the trunk compartment, and the trim non-existent, I removed the trunk lid to facilitate the work. I noted that the torsion springs cannot held the lid open; I removed the rear grille and had a look at what I did a long time ago: the rods are similar to the ones from a real car. I could not remove them, but I was able to bend a leg, giving more upwards strength; it’s now enough to keep the lid wide open. I then reassembled the master switch and had a good look at the small switch for the seat. After a while, I discovered a broken wire; no wonder the seat was not functioning! I cannot solder the wire to the proper place as the space is not sufficient and the switch too near from the door/pillar. The dilemma was: do I let it that way, reassembling all or do I remove the wiring to repair the switch? When I’m at finishing something, it must function, therefore the decision came rather quickly: I’m repairing the switch, which is a major job: taking the carpet out. I knew that I could not rescue it, but boy, it was well, too well glued! While I’m at that, the quarter trim panels are coming out too because the switches are not functioning. I had no clue how the wiring would look like; I completely forgot how it was done. I will have to cut the wires going to the door, repair and reinstall and solder together the cut wires. I will use less material to keep the wires together; the vibrations are so few that its not necessary to attach them the way I did. On top of that, the RH front window is more functioning! The motor is turning, but nothing is happening. Some more panels to remove! Some good news: the switch for the headlamp is OK, but the LH lid for the headlamps is jamming and is staying closed. Something more to repair! I have the impression that this model is like a real car which was technically neglected: good looking but not reliable. And each repair leads to another one. Nice!


-
Roger's handcrafted 1:12 scale models
Roger Zimmermann replied to Roger Zimmermann's topic in Our Cars & Restoration Projects
It was a picture. I most probably got a print of the negatives; that emblem was with the right dimensions...Unfortunately, it's now blass. As I'm doing a major job on this model (the report will come tomorrow), maybe I will let do decals. @Tom: Thanks for the fidelity! In the next few month, you will have something to see with the Toronado! -
Roger's handcrafted 1:12 scale models
Roger Zimmermann replied to Roger Zimmermann's topic in Our Cars & Restoration Projects
You are too kind! Some wires are missing (like on the Mark II, adding tem just creates a mess) and the clamps at the water hose are missing too. I will however add the clamps. It will be like a general revision after 30 - 40 years! -
Roger's handcrafted 1:12 scale models
Roger Zimmermann replied to Roger Zimmermann's topic in Our Cars & Restoration Projects
As I had no motion with the switches, I had to assume that it was some oxidation there or worse, an open circuit. Again, everything is assembled with screws; I could remove the knobs to have a good view at the contacts. If the moving parts from the contacts were made with gold to avoid the oxidation, the pins were just brass and, indeed, they are black. A light cleaning was done as good as I could because, unfortunately, the switch base cannot be removed from the wiring. I will add some contact grease. When I was doing the switches for the Mark II, I wanted to see how I did the switches for the Toronado. I had unfortunately not the courage to remove all the parts attached with screws. It’s a pity because the master switch is almost a miniaturisation marvel and the way I did the insulation at the knobs was fantastic: I let first the knobs to be chromed and then I did the necessary insulation with 2K body filler! Easy, not a lot of machining and effective. I removed also the motor from the seat; fortunately, it’s not dead, it’s turning well with 1.5V. However, the seat’s tracks, a rod into a tube, was prone to jam. I will redo the tracks the way I did them for the Avanti and Mark II. The system itself with the string will stay because the mechanism I did for the Mark II could not be used here due to a lack of space. Cars were getting lower in the sixties! In between, I removed the hood because the mobile headlamps may require further disassembly.


-
If I'm not completely next to my shoes, this system must be functioning to have some braking power as it's a combined assembly. On vehicles with the ABS as a separate module, yes, you can disable it.
-
Roger's handcrafted 1:12 scale models
Roger Zimmermann replied to Roger Zimmermann's topic in Our Cars & Restoration Projects
Now that the Mark II is ready, I have to really finish the Toronado. Why did I not finish it many years ago? Probably because I was very busy with my real cars; anyway, the fact is that the electrical system was not finished and the seat was no more functioning. In the seventies or eighties, a neighbors did for me a voltage reducer: the electrical motor for the traction is fed with 6V, but the motors for windows, seat and headlamps are fed with 2V. I had no idea if this device would still function, I never tried it. During the break in January, I did a case for four 1.5V batteries (it could be that then I did not continue because I had no 6V source) similar to the one I did for the Mark II. The first thing I did was to hook that voltage reducer and try if the windows would work. Nothing! However, the inside illumination was on, so I knew that the voltage reducer was active. As I had nothing to lose, I tried with 3V. The LH window came up, but with a high pitch noise! The RH window came up and down without noise, but very slowly. The quarter windows were OK too, but much slower than I had in memory. The seat would not move and the headlamps would not come up. The first work was to open the LH door and remove the motor. In retrospect, I did a very good job as everything is attached with screws. Once the motor was out, I separated the motor from the reduction gear and let it run with 1.5V. I had then the confirmation that the vibration came from the motor and not from the reduction! I put some oil at the output shaft, without difference. The back is closed; I tried anyway to put a drop of oil on it. I assume that the capillarity from the construction let some oil come at the right place as with the time, the motor went to a quiet mode. It’s now back in place, without noise. With 1.5V, it barely goes up and down when connecting the battery directly to the motor. Therefore, I tried again with 3V; it goes somewhat quicker, but you can almost get asleep in between. That’s a design flaw: to improve the situation, I should use the same motors as the ones from the Mark II; this would require heavy modifications at the doors because the transmission (or reduction gear) is square. To understand what was happening and continue the electrical work, I had to remove the rear seat. I discovered the electrical mess under it; if I have the schematic of the system, I don’t have identified the wires with the proper color, so I’m lost. There will be some detective work to find out. As some elements covered with leather were out, I cleaned them with a leather product. Despite the age (about 40 years old), they are in good shape; I must add that the mileage is maybe 10 yards!


-
Roger's handcrafted 1:12 scale models
Roger Zimmermann replied to Roger Zimmermann's topic in Our Cars & Restoration Projects
Randy, the model is complete. The windows are in, the "license" plate is on; I did recently a picture from the front with the lights on (the picture is somewhere here) and, to my dismay, there is no light for the license plate! I'm now with the Toronado. There is here a lot to do as you will see later. -
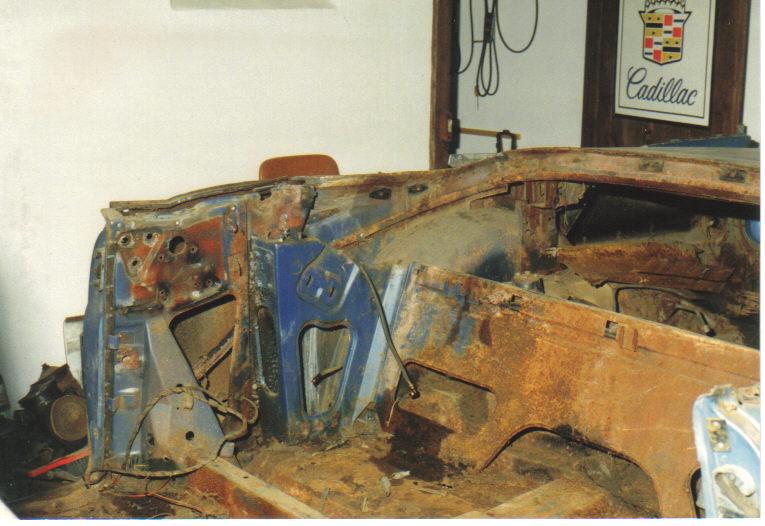
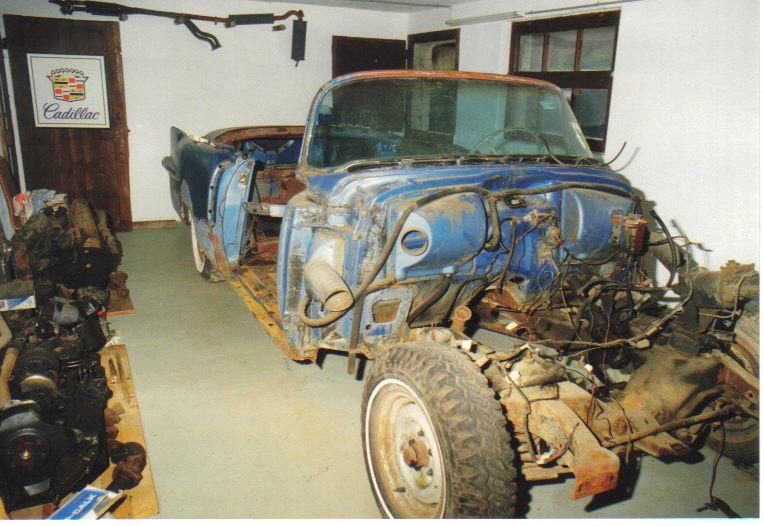
The readers will have to excuse me: I don't remember exactly what I did remove in a chronological order. Here are views from the "A" pillar. They are not very nice as you can see. Some metal had to be cut to weld good steel. It was necessary to remove the reinforcement of the pillar as it is weld over the front floor. All that happened in 1991. In between, I got in touch with a US vendor who claimed he has the exact replacement parts for my car. As I don't believe easily such promises, I ordered the repair patches for the front floor. What a deception when I got them! I was good steel, but a crude and pale imitation of the correct form. I never used it; instead, I used the metal to repair other parts. I did myself the patches for the floor with the proper details. It was clear to me that the rear fender had to be removed to replace the trunk floor and the floor under the rear seat. I began the task by removing the outside rocker panels. The view was very discouraging to be honest.


-
Ouch! Interesting solution you have in the US! Unknown here.
-
Roger's handcrafted 1:12 scale models
Roger Zimmermann replied to Roger Zimmermann's topic in Our Cars & Restoration Projects
As this is a concise question, I have to answer it: no, I will not do that. It would require a huge space which I don't have and I have anyway no envy nor talent do do a scenery. Look, I'm way from perfect! -
Roger's handcrafted 1:12 scale models
Roger Zimmermann replied to Roger Zimmermann's topic in Our Cars & Restoration Projects
Hi all! I just can say thank you for al the recent comments. I should respond to each one; you will understand that I will do it that way. I'm just amazed how many people followed this construction since the begining and were not tired by the slow pace nor from the sometimes abstract posts. Barry Wold had right: I will get here a large audience. Thanks again to all, but I will come back and maybe sooner as you are thinking! However, do not anticipate a large project: I wrote here what I'm intending to do next. -
1962 Lincoln convertible
Roger Zimmermann replied to ericmac's topic in Our Cars & Restoration Projects
Well, maybe! When I'm working on my real cars, I'm sometimes wondering why the space is so tight on such large cars! It could be that FOMOCO had special tools for that. As I never had the "pleasure" to work on a 1:1 scale Lincoln from the sixties, I have some difficulties to figure the issue. -
I found my luck (maybe)!
Roger Zimmermann replied to Roger Zimmermann's topic in Our Cars & Restoration Projects
Be careful when parked on grass, you may not find it! Nice car, it's also a green color I could go along. -
Roger's handcrafted 1:12 scale models
Roger Zimmermann replied to Roger Zimmermann's topic in Our Cars & Restoration Projects
Thank you Mr. Administrator! Matthew, I will do it that way. -
Roger's handcrafted 1:12 scale models
Roger Zimmermann replied to Roger Zimmermann's topic in Our Cars & Restoration Projects
Thanks for your comments! I assume that the sole way to keep this thread active is to put new messages. Therefore I think it would make sense to continue here with the other adventures: there is that way only one thread dealing with scale models. Or, to make a comparison: unimogjohn and his thread "Avanti R2, 1963, refresh". The refreshing from the Avanti is long done, and he is telling his car's adventures on the same thread. By the way, I have about 1000 views more that John! -
Roger's handcrafted 1:12 scale models
Roger Zimmermann replied to Roger Zimmermann's topic in Our Cars & Restoration Projects
I really took my time to put the letters on the hood! Like at the rear, I did a jig to help for the position of the letters. I glued some paper at the back of the guide but I remove it after the 3 first letters were glued. This time all went well without disappearing letter! I did also a method’s change: I put the glue at the back of each letter; at the rear, the glue was deposited on the paint with a toothpick; I could better control the glue quantity when it was at the back of each letter. Technically, the model was finished on January 19, 2019, not quite 9 years after the beginning which was on February 3, 2010. I’m glad I survived all that time and I’m glad YOU survived too! There will be better looking pictures when I can do them outside with a good light. Till then, well, it will be quieter. As I wrote some time ago, I have to finish the Toronado. If I can continue here with that finishing work, then my reports are not yet over. does it makes sense to relate my model's stories here or should I begin a new topic? What do you think? And what the moderators are thinking? Thank you to all who followed and commented this adventure. It was a pleasure to read those messages; they helped also to continue that mad project! I forgot something important to add: the final weight: front 1'686g, rear 1'798g for a total of 3'484g or 7.68 pounds. A real heavy weight! It's interesting to note that, despite the engine weight, the front axle is lighter than the rear one.


-
Yes, it seems that way.Wait some days! Or do you want to see the next pictures today?
-
1962 Lincoln convertible
Roger Zimmermann replied to ericmac's topic in Our Cars & Restoration Projects
Can you see the bolts from under? -
In contrast to other parts of the vehicle, the firewall was almost perfect. With a vehicle in that condition, it's a relief to see something acceptable. Once the roof gone, the view at the rear quarter was not too bad either. One access plate to the window's motor was missing. We are still in 1990. Many parts were removed and stocked next to the car. I had to think seriously how to gain usable space... The "real work" began in 1991. We see on the last picture that the plate behind the rear seat is gone. In between, I found somebody who was willing to help. The price he asked per hour was acceptable; he would only "beat the metal" and weld. All the rest was my task, which means bore the spot welds, clean the rust and so on... I began to look for a better floor for the trunk and under the rear seat. Not an easy task, but I found something. More about it later.