Roger Zimmermann
-
Posts
3,130 -
Joined
-
Last visited
-
Days Won
24
Content Type
Forums
Gallery
Events
Everything posted by Roger Zimmermann
-

1953 Rolls Royce
Roger Zimmermann replied to antiquelimoofindy's topic in Our Cars & Restoration Projects
Certainly an unusual car in the US! I like it, even if I prefer the design of early sixties RR models. -
Roger's handcrafted 1:12 scale models
Roger Zimmermann replied to Roger Zimmermann's topic in Our Cars & Restoration Projects
On the pictures, it seems that the details were finely reproduced. If I'm remembering well, there was a lot of rework: the plaster buck was too approximately done and a lot of bubbles were distributed through the polyester/fiberglass. This material is not kind at all with files and dentist mills! Once the LH door was ready, I put it on the car and began to solder the previously separated wires. A test was done when each pair of wires was soldered. It was a good move: for an unknown reason, some buttons let the window down when up was desired. At the end, they all work the way they should; I’m wondering what for a gremlin I introduced! The wires were next covered with the cover filler and the kick panel was installed. The next problem came when I wanted to install the light switch to the dash frame: the wiring coming from the front end has an insufficient slack to allow pulling the switch towards the back. The sole possibility was to remove the front end panel, motor and end travel switch. Before I’m installing the whole parts, I will test if the electrical circuit is still OK.


-
I believe this is the same all over the world! When we searched a house in France many years ago, they all had a garage. Full of crap!
-
Roger's handcrafted 1:12 scale models
Roger Zimmermann replied to Roger Zimmermann's topic in Our Cars & Restoration Projects
At the end of year 1975, I bought a reflex camera, analog of course. There was a dramatic improvement for the pictures, even if the scans do not do justice to the change. During October 1974 and the end of year 1975, many improvements were done at the body. Unfortunately, I did no picture during that time. The doors were attached to the body with their hinges, the firewall was finished and it seems that the underbody was ready too. During February 1975, I began to attach the front fenders to the body with the help of a temporary bracket at the frame’s front October 1975: the body is rather complete; the front end was done in brass as well as the inner side panels from the front fenders. The last picture from the body is showing the hood open, maintained by the hinge’s springs. The frame was done some years ago, but it was incomplete: the front suspension was not yet done. They were not part from the frame’s blueprints; therefore, I probably had to look at a real car for the dimensions. The last picture from this retrospect is showing the engine on the frame; the front torsion bars are not yet done because I waited to have the weight from the model to do them. I will continue now with the “normal” report. I did a protection for the wiring; with a brass 0.4mm thick is certainly overkill, but my 02 and 03mm are gone! I still have doubts about the reliability from the window system; something which is working all the time with ease: the door locks. Their design is much better than the one from the Mark II and it was also easier to do them.


-
Roger's handcrafted 1:12 scale models
Roger Zimmermann replied to Roger Zimmermann's topic in Our Cars & Restoration Projects
In fact, I was searching a precise picture for somebody. Of course I did not find it until I remembered that I had some pictures in a folder! As you can see, the text is very short because I don't remember every step of that build, just the main ones. If I'm taking the pain to do that, it's indeed to have that build documented somewhere. -
Roger's handcrafted 1:12 scale models
Roger Zimmermann replied to Roger Zimmermann's topic in Our Cars & Restoration Projects
With all body parts ready, the next step was logically to assemble them. At that time, I could take an incredible quantity of dimensions from a real car which was in the same town. I just had a bicycle; not very convenient to carry all I needed. The first picture from that batch, dated Sept. 26, 1969, is showing the assembled body with the plaster one in the back. That plaster unit was still in use: I carved the roof structure. The next step was to do the floor. A difficult task, accomplished probably mainly with the help of pictures and the Jo-Han scale model seen on a previous picture. The basic material is again plaster. The main problem, by working with polyester and fiberglass, is to separate the finished part when the polyester is cured. It this picture from spring 1970, it’s obvious that the separation did not go well. The floor is not yet glued to the body; it’s just temporary in place. I assume that when I took this picture in 1971 or 1972, I have got the blueprints from Oldsmobile. Most crossbars from the floor were done with brass as I had their exact shape and dimension. During summer 1973, the floor was definitively attached to the body. Inside rocker panels were done in brass too. The last picture from October 1973 is showing the body; some internal structure has been added to it. I had also the blueprints for the frame; I assume that I did it in parallel to the body.


-
Roger's handcrafted 1:12 scale models
Roger Zimmermann replied to Roger Zimmermann's topic in Our Cars & Restoration Projects
Today, I will relate the birth of that model. Some elements were already done as early as autumn 1967, like the engine and other small parts. My goal was to have a model as accurate as the real one, which means many elements would be assembled with screws. Therefore, the front fenders would be bolted on; a firewall had to be done accurately to allow that specific operation. To spare on weight, I imagined doing a core with wood in two parts: once the main body was carved and the negative molds done, the idea was to remove the front end to do the firewall at the right position. The first picture from February 1968 (yes, this picture is 51 years old!) is showing the wood core. As you can see, those pictures are small and are scanned from some B/W pictures; some will be colored ones but the colors are faded because of the age. There is some plaster on the wood at the second picture. Of course, I bought the cheapest plaster, the one for remodeling a room, which was not especially clever as this kind of plaster is too brittle. The next picture is showing the overall shape of the body; it was in April 1968. After the negative molds ware done for the doors, I carved some plaster away to shape the B pillars. The next picture from Spring 1969 is showing the carving for the hood reinforcement. When the mold for that part was done, the buck was cut to and the front end removed. This is the next picture. The negative mold for the rear of the body was done in July 1969. Finally, all positive parts are sown on the last picture. Some rework is needed!


-
Roger's handcrafted 1:12 scale models
Roger Zimmermann replied to Roger Zimmermann's topic in Our Cars & Restoration Projects
The trim was assembled on the LH door and the assembly was installed on the body, with the harness pushed into the A pillar. I began to solder the cut wires to have a functional door master switch. When I connected the positive and negative wires, I tried the LH window. It went up and down with some hiccup. Obviously, the thick wiring coming out of the door is touching the window front guide. I will have to add a protection here. There will be two more screws into the door shell!
-
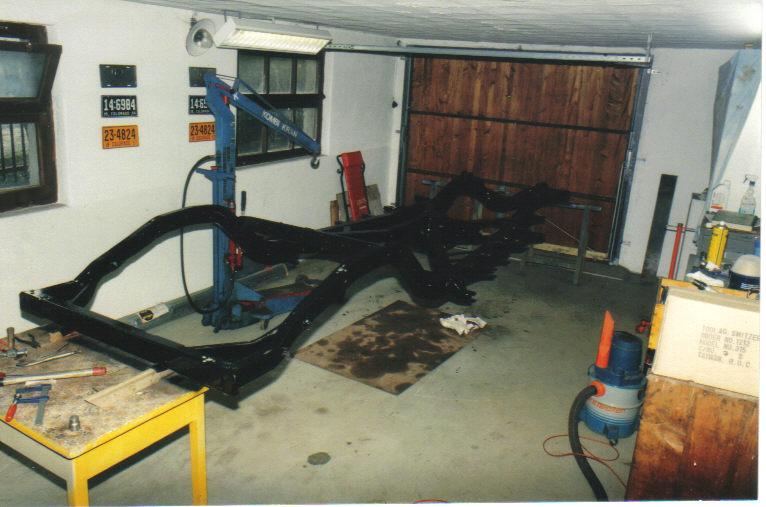
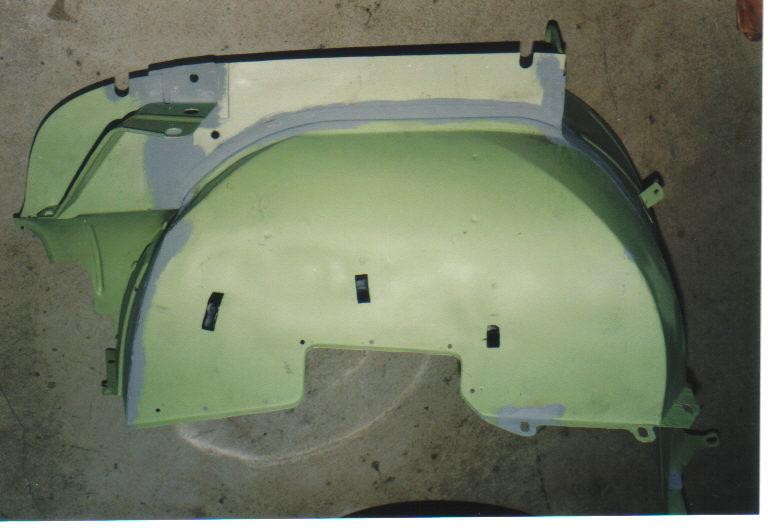
Once the wheelhouses ready, the next task was to weld them to the front fender, as shown. As noted earlier, the frame was in excellent condition. There was some surface rust at the rear of it, but nothing serious. A good friend with a truck and proper equipment to load it on the bed forwarded it to the company who did the sandblasting and primer. Of course, the good friend took it back to my shop when the frame was ready. I expected to spray the black coat outside; halas, as it is often in Switzerland, the weather was not good at all. The added logistic problems convinced me that I had to do the paint inside. I had to form a boot with plastic foil as other cars were stored inside... I have to admit that the black coat on the frame is not my best job...But, who cares?


-
During the same period, I began the work on the front fender. The ones on the cars were not bad looking at first glance. Unfortunately, they had been "protected" with a heavy coat of underbody material. It was a stupid investment: the water flowed at the joints in the motor bay and could not escape due to the thick material. The result: rust again. With 2 other front fenders, I could rescue enough pieces to have a pair of inner wheelhouses. The separate parts were sandblasted and primed prior to assembly by welding.

-
Roger's handcrafted 1:12 scale models
Roger Zimmermann replied to Roger Zimmermann's topic in Our Cars & Restoration Projects
The string at the LH door was replaced; I modify also the tensioner similar to the RH side. The lower door’s molding was removed as I intend to sand and buff the paint under the character line; this lower part still has a strong orange skin.
-
Roger's handcrafted 1:12 scale models
Roger Zimmermann replied to Roger Zimmermann's topic in Our Cars & Restoration Projects
Thanks for the comments, Mike! Yes, it's a huge difference between 1:1 scale and in this case 1:12. What can be completely logical/practical on a real car may be impossible on a scale model. I believe the diameter from the drum is 2mm but the width between 2 walls is 1.2mm. Not very practical to run a rubber band 1mm width! -
Roger's handcrafted 1:12 scale models
Roger Zimmermann replied to Roger Zimmermann's topic in Our Cars & Restoration Projects
The answer I gave to the suggestions from Spinneyhill and Matthew was far from diplomatic! Well, sometimes nasty answers are coming out...Just for the perspective: I'm attaching 2 pictures; one with the motor and the drum on which the string will roll on (sorry, I don't have a rule in inches) and the other one showing 2 or 3 pulleys which guide the string. As I wrote, it was out of question to reengineer that system, for that, I could/must redo both doors which does not makes sense.

-
Good luck with the roof. It seems that trimacar gave you useful instructions.
-
Roger's handcrafted 1:12 scale models
Roger Zimmermann replied to Roger Zimmermann's topic in Our Cars & Restoration Projects
Thanks Steve for your comments! As a moderator/administrator, you cannot see or comment all treads! Interesting that you were yourself also a DSM! I was certainly not good in the beginning: it was the bad period where the engines stalled without reason, mostly in A bodies and V6. I had at that time many unhappy customers at the phone; it was not funny at all. Support from GM was...very remote. Fortunately, things improved a bit early nineties; probably most dissatisfied customers left. The quality of the products was still miserable in the nineties; there was some improvement early 2000. Right now, the quality is OK, but the customers are almost all gone. Only some fools are still buying GM US vehicles; there is no marketing, no organization behind the product. Sure, China is more promising and the number sold there is incredible; I have difficulties to understand why GM still has a minimalist presence in Europe; why not pull the plug once for all? In the early nineties, GM created an organization for Europe; I'm wondering if they just sent to Europe the most dumb people, because nothing good cam from that. An example? at the end of the nineties, they had a great idea: to promote and sell in quantity the Chevrolet Astro Van! A certainly nice delivery truck well adapted for the US, but certainly not a modern, efficient and stylish vehicle to be sold in great numbers in Europe. That stupid idea was presented in one staff meeting somewhere in Europe; that day, I destroyed my chance of a promotion when, as a Service guy, I asked if they were serious with such a stupid idea when all the Sales people said nothing! Nevertheless, the Astro Van never came. We could certainly speak for hours about our adventures with that company! As we had not frequent contacts in the US, the name Darwin Clark is unknown or I forgot. -
Roger's handcrafted 1:12 scale models
Roger Zimmermann replied to Roger Zimmermann's topic in Our Cars & Restoration Projects
Thanks for the link, Nelson! I had a good luck with a computer or printer cable; from it, I could get many color coded wires, diameter 0.8mm. As the Olds completion will not require a lot, I'm set. I could not evaluate the outside dimeter from the cables in the link; anyway, I don't need any wire for the moment. -
Roger's handcrafted 1:12 scale models
Roger Zimmermann replied to Roger Zimmermann's topic in Our Cars & Restoration Projects
People, wake up! and have a look at the picture again. Try now to put your rubber band or whatever in the same room... When I did that "design" about 40 years ago, I had wonderful examples of window systems operated with a rather rigid rubber or plastic band. If I'm right, Cadillac Sevilles had such a system in the eighties. It was my best to scale down such a system. Perfect? No way, but something larger in diameter is just an illusion. Further, my goal here is not to reengineer the model completely, but just try to give it a second life. A 100% mechanical system like in the Mark II would be 100% more reliable but, read what I wrote just before this sentence.
-
Roger's handcrafted 1:12 scale models
Roger Zimmermann replied to Roger Zimmermann's topic in Our Cars & Restoration Projects
A quick note to tell that the RH side is now ready. I will not replace the string at the LH rear quarter window, but will begin soon its replacement at the LH door. Thanks to all those who are reacting to my posts! -
As everybody knows, a car is not only a frame and body. There are also mechanical little things which permit the thing to move. Once I had all the parts for the engine, the block was sent to a mechanical shop to bore it, adjust new pistons (.030 oversize) and grind the main journal of the crankshaft at .010. I did myself the remaining assembly; unfortunately, I have no pictures as I had some for the same work on the de Ville and Brougham. I did also the overhaul of the transmission. The one I bought was no more good (I don't remember what was wrong) and, with 3 transmissions, I managed to do one. It was the second transmission I ever overhauled (the first one was for the de Ville some years earlier); I was absolutely not sure if my work was good. This transmission was bought in 1991; I revised it in 1996... On June 8, 1996, I could apply a color coat to the firewall. When the firewall is painted, it means that the assembly of revised or new parts is not far away!


-
Now, body and frame are next to another. By chance, the room is wide enough! Once the frame was put on side, I could begin to clean the underbody. What an ungrateful job! Even with new pieces welded as well as the ones prepared outside, there was still a large surface not yet touched. As I have no water in that place, I was not the nicest one after a cleaning session. Fortunately, the home drive was no longer than half an hour! As I wrote earlier, there is no heater in that room. There is a minimum temperature to paint parts with a 2 components product. By chance, I could prime the underbody in October, before it was too cold. During springtime 1996, the firewall was sealed. The color coat in not far away!


-
No, they are just much larger! (sorry for that bad joke)
-
Roger's handcrafted 1:12 scale models
Roger Zimmermann replied to Roger Zimmermann's topic in Our Cars & Restoration Projects
Probably I’m not alone to act that way: when I see difficulties or don’t know how to perform a task, I’m finding a lot of other things to do: answer emails, polish the paint, improving something which could be done later, and so on. But once, it’s over with distractions. The string replacement at the quarter window was delayed and delayed until I had to grasp the task because only when it’s done can I go further with the model. It was like I feared: not easy. I had some habit to work with that new material at the RH front door; finally, I had the courage to begin the quarter window. On paper, it’s easy: a string, do a loop with that, install the window guide and the motor. Maximum 7 screws and no space! As you can see from the pictures, the drum at the motor cannot be seen when it’s in place. The string must be rolled on the drums before the installation and, if both strings are not under tension, they unroll themselves! I had a first half success: when assembled, I saw that one string is not in its guide (a déjà vu situation!). I removed that guide support, the one which took about an afternoon to install the first time. I took it out to make a wider and deeper guide and I imagined a simple tool to help at the installation. My idea was correct; the guide was in after 20 minutes. Then one electric wire at the motor broke because I used it to manipulate the motor. I could partially take the motor out and solder the wire. The attached pictures are showing how the window is moving; the system was pictured in the 1966 Fisher body manual and I adapted it. I’m still unsure what to do with the LH quarter window. I will remove the upper trim and if I don’t see any damage at the old wire, I let it that way. I will however rode the string at the LH front door.


-
I was not aware that such accessory existed!
-
If I had a picture with the wheels steered, I could then be sure at the pivot's location. An arrow on that picture showing the pivot location would also be OK.
-
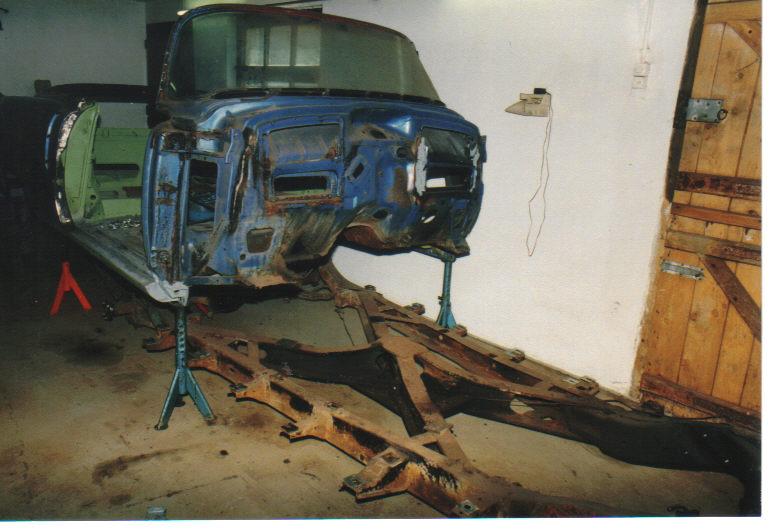
To avoid too much dirt on the other cars, I put some clear plastic as a separation between the working space and the storage space. It was not perfect, but good enough. When the body was repaired, it was time to remove the frame. I had plenty of opportunities to have a good look at it and, fortunately, he was intact. No rust holes, no major damages. At least something very positive. With a closed car it would have been possible to remove the frame prior to the body work for a better accessibility. However, I'm not so sure as those bodies had a notorious lack of rigidity. Anyway, on a convertible as ill as mine was, to remove the frame would have permit to body to break! Due to space limitation, I had first to push the body & frame on the left of my room (why not to the right? don't ask, I have no answer!) To separate the frame from the body, I lifted the whole unit as high as I could, removed the about 20 screws and then I began to lower the frame with a floor jack. It takes time, especially when working alone. The pictures were done in August 1995.