


Roger Zimmermann
-
Posts
3,130 -
Joined
-
Last visited
-
Days Won
24
Content Type
Forums
Gallery
Events
Everything posted by Roger Zimmermann
-

Roger's handcrafted 1:12 scale models
Roger Zimmermann replied to Roger Zimmermann's topic in Our Cars & Restoration Projects
A few vacation days in France plus some maintenance work on my 1:1 cars delayed the work on the Toronado. As I’m waiting parts for my ’57 Eldorado Brougham, I had time to finish the second front fender’s brace. After installing the LH front fender, I checked the alignment with the pumper. Surprise! The first brace was touching the brace tying the bumper end to the main bumper. What to do? Modify the brace? No! I adapted it to the other side without too much hassle and I did another one for the RH fender. The installation of the front bumper will not be easy: there is little distance between the bumper and the frame; unfortunately, I don’t have captive nuts inside the frame but a plate in two parts with threaded studs. How did I install the bumper years ago? Another element is now getting my attention: the gas tank. I will do like with the Mark II: the current for the main motor will be by inserting a “fuel hose” into the tank neck.

-
Indeed I'm following this thread however without comment because A/C plumbing is not my ding. Keep that thread!
-
Due to a sort vacation, I had no time to look at your thread. What you are doing is nice; I like it!
-
Roger's handcrafted 1:12 scale models
Roger Zimmermann replied to Roger Zimmermann's topic in Our Cars & Restoration Projects
Thanks Neil for that video. I saw it already somewhere and it belongs well to this thread! -
Well, at that time, there were no forum nor computer at my disposal. Don't remember if I was already a club member. Yes, this "company" is still advertising in the Self Starter. The name is beginning with "A"! It's rather surprising that, when I published this report in the Cadillac forum, nobody asked or made a comment about that dishonest supplier.
-
I was not yet completely ready with sheet metal: the doors were waiting. The ones on the car were really bad. I contacted a known supplier in the USA; (he does advertise in the Self-Starter, the Cadillac club magazine) he said that he had a good pair of doors. I asked again about rust and he said that he spent the whole Sunday with his son to inspect them and they are excellent. OK, please ship them! Well, I don't know what for glasses he had at the time; maybe the ones to observe a sun's eclipse: they were as bad as mines (or they rusted in the plane between USA and Europe). So with 4 doors, I could do 2, but I had to weld some new sheetmetal; the lower outside panels were also made from scratch for both doors. Are you surprised if I don't buy anything anymore at this location?


-
1952 Studebaker Commander Starlight Coupe
Roger Zimmermann replied to Eric W's topic in Our Cars & Restoration Projects
I know your feeling: I bought for 2 years (yes, two years) a '72 Cadillac coupe. I let transport that car to a guy I know who is also located in the USA, to do some work on that car. He hope that the car will be ready to ship to Switzerland at the end of this month! -
Nice car, Don!
-
1950 Crosley Farm O Road Restoration and more
Roger Zimmermann replied to dalef62's topic in Our Cars & Restoration Projects
How easy of difficult is the powder coating? I suppose you need a specific equipment. I always thought that this process cannot be done "home". Anyway, your little engine is good looking! -
Roger's handcrafted 1:12 scale models
Roger Zimmermann replied to Roger Zimmermann's topic in Our Cars & Restoration Projects
There are small parts I never did for an unknown reason. For example, when the headlamps are closed, a shield is protecting them against dirt. On my past pictures from the front end, it’s obvious that the shields are missing. They are now added. After that, I installed the RH front fender. Another part was never done: the small braces securing the lower front end from the fenders to the radiator cradle. One is now added, I will paint it when the other one is done. Some days ago, I had to remove the RH front fender: the upper pin for the door hinge was protruding too much and was pushing against the fender, creating a bulge in the polyester. Retrospectively, it explain why I had difficulties to have the lower part of the fender aligned with the door. After one hour, everything was back in place and after a while, the bulge disappeared. There is another part which I always wanted to do, but delayed and delayed: the front air dam. I had not too much documentation about that; I found in Google 2 decent pictures how the dam should look like. There are still more parts I will not do: left and right from the main dam, there are 2 smaller dams which are following the inner side of the frame. As I have no more 0.2 or 0.3mm brass, I took 0.1mm material. This thin brass is giving about the same flexibility than the real one which is made with plastic!

-
Roger's handcrafted 1:12 scale models
Roger Zimmermann replied to Roger Zimmermann's topic in Our Cars & Restoration Projects
There are still older cars having them, but they are quite rare now! -
Roger's handcrafted 1:12 scale models
Roger Zimmermann replied to Roger Zimmermann's topic in Our Cars & Restoration Projects
Well, you may send it, but there will be some rework needed! By the way, funny scale model! -
Roger's handcrafted 1:12 scale models
Roger Zimmermann replied to Roger Zimmermann's topic in Our Cars & Restoration Projects
Fortunately, my mother never interfered with that! The yellow headlamps from France is a thing of the past. They now have white headlamps like the rest of the world! Anyway, it was maybe possible to tint the round headlamps without too much costs, but now, with the integrated headlamps it's another matter. I'm glad they went away with that. They may have now good light to drive at night, but they still are undisciplined. -
Roger's handcrafted 1:12 scale models
Roger Zimmermann replied to Roger Zimmermann's topic in Our Cars & Restoration Projects
Before I soldered the headlamp wires to the main lead, I tested several times the headlamp system. It’s functioning well now that I solved the problem created by the LH headlamp door going too far inside the front panel and jamming. The light provided by the 4 headlamps is not very bright; the purpose was not a great illumination but a functioning one. The orange/white wire is for the parking lamps located in the front bumper. Now, most problems are solved, it’s time to install the parts lying around and do a new carpet.

-
Maybe Mike Macartney will tell you how to do; he has some experience with wood work!
-
Roger's handcrafted 1:12 scale models
Roger Zimmermann replied to Roger Zimmermann's topic in Our Cars & Restoration Projects
Well, it was not my intention! As you can see, it's like a real car: this unsolved detail is leading to another and another, and so on! here, of course, is not to relate how I did this or that (if I can remember, which is not always the case) but just to show the actual adventure. I'm on the good way now, as you will see with my next report later today or tomorrow. Thanks for watching! -
As I wrote in another forum, for 20 years it was difficult to ask for past experiences, especially when one is living outside the US. Nowadays, that task is easier of course. Nevertheless, to be honest, I had/have also good experiences in the US: Klaus Vokak with his antennas (he is now retired) and Terrill Machine who did many water pumps for me. There may be a few others, but I don't remember.
-
Roger's handcrafted 1:12 scale models
Roger Zimmermann replied to Roger Zimmermann's topic in Our Cars & Restoration Projects
Indeed, the electrical system for the retracting headlamp is OK. Again, I had to search a bit; I had current to the motor but only if I added a ground. Then, I remembered that there is a ground wire at the inside switch. As I was not sure if I had to remove again the dash surround, I put only one screw; the nut was embedded in the polyester, therefore, I could not have a ground! Once the proper screw was torqued, the motor for the headlamps turned in the desired direction depending to the position of the headlamp switch. As the motor is now fed with 3V, it may too much voltage for this application. At first, I tried with 2 30 Ohm resistors in serie, but the motor could hardly open the doors. With just one, it’s better but I had to “massage2 the actuating rod to have the proper tension (either open or closes) at the LH headlamp door. As the rod actuating it is double the length from the RH side, it’s no wonder that it’s a bit tricky. The pictures are showing the actuating rod, the bell crank and finally the actuating motor and the hidden resistor.


-
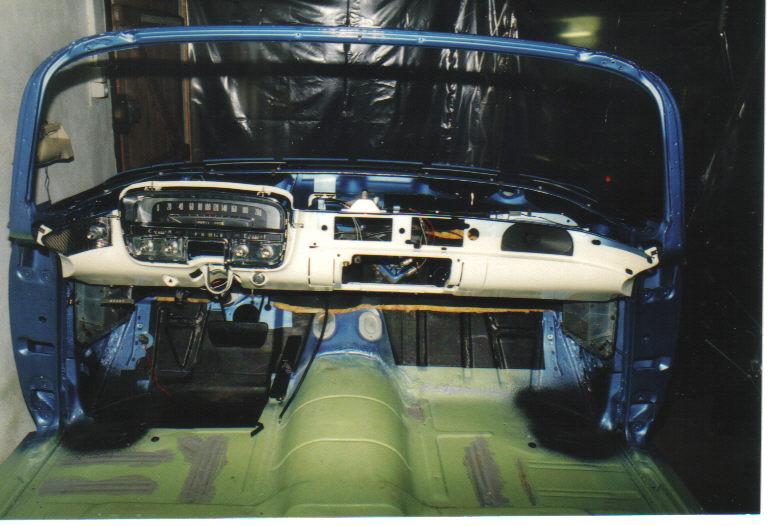
It's now time to install the various little parts cleaned or plated. After a while, the firewall is ready. The dash board is also installed. At the last minute, I'm not satisfied with the large chrome part which come across the front panel. Something more to work on it... The speedometer was in miles; I let engrave a plexiglass plate with km. The odometer stays in miles.

-
Bit after bit...Now the frame is almost completely assembled. The front springs are not yet installed as I need the weight of the engine to install them without too much trouble. I'm especially satisfied with the wheels. I could almost write a book in regard to the plating of the 5 wheels. First, I sent only one wheel to a known plater in the USA, country of unlimited possibilities. It was not cheap (it's a Cadillac after all); when plated, the wheel was sent to an hotel in the States: I was there for 5 weeks for GM. In my luggage, I took 2 other wheels to send to the plater. When the plated wheel came to the hotel, I was really nervous to see what was done. It was a huge deception. On the visible part, the chrome was good; however, it was already peeling at the back! I don't remember exactly what was done with the plater; anyway, all the wheels came back to Switzerland and I got no refund. I took contact with a plater in Switzerland and showed him the "good" work made in USA. He suggested to do again the wheel already plated and as I had 5 of them, he could construct a device to have a good chrome plating. After some months, the wheels were done and it was fantastic. Also expensive, but a much better quality of what I had from the States. Dear American people, I will do now a nasty remark: you may have the best products in the world, but why most of your companies are unable to repair components correctly ? It could be because there are more artisans in Europe than in the US, with a longer tradition, who knows. I tried several time to have something repaired in the US, it was most of the time a disaster. Another example: during vacation in Florida, I took the Delco-Moraine brake booster with me to let repair it at one of the advertisers in Hemmings. The booster came back to Switzerland after a while, very good looking. I was curious to see what would happen with some brake fluid in it. I poured some fluid and pumped the rod. I don't know what happened inside: no oil came out. After disassembly of that booster, I saw lots of RTV sealant and a mess inside. At the end, I did the repair myself. Why had I the stupid idea that Americans can do it better? Sorry again for those nasty remarks... Now the engine and transmission are installed. The valve covers and air cleaner are not yet painted with the correct color. We are already in October or November 2008...


-
Roger's handcrafted 1:12 scale models
Roger Zimmermann replied to Roger Zimmermann's topic in Our Cars & Restoration Projects
Thanks for your comments, Pat! However, as you can read below, I'm not sure if I choose always the better solution! Anyway, as you stated, i was busy most of my life! What was I thinking when I began this model in the sixties? I found notes about brake light and I remember doing a functional directional signal lever. The fact is that I installed tiny bulbs at the back together with larger ones. I did also a strange electrical circuit with a 6V wire connected to a derivation box and from that box, a wire going into the trunk. For what purpose? Brake lights? It could be. Anyway, there is no brake switch at the brake pedal and I have no intention to do one. I removed that wire and the black wires which were connected to the large bulbs are now cut because I have no idea where they are ending towards the front of the model. And, of course, there is no documentation. I rewired the small tail bulbs as I explained previously and did a functional test. 2 bulbs were hardly lit when current was applied. If all bulbs would be connected in parallel, there would hardly be a difference. But with 2 bulbs in serie, if the internal resistance is not near the same, the brightness of each bulb is considerably different. I had to match at least two bulbs to have an acceptable result. If I remember well, some bulbs have a resistance of 8 Ohm and other near 10 Ohms. Now, the back is ready, I can go to the front and find how the system should be functioning. As you can see, the end panel was made with brass, like the gutter for the trunk. The license plate is of course installed on hinges.
-
What is missing in my engine bay?
Roger Zimmermann replied to SuperNova75's topic in Our Cars & Restoration Projects
Well, I'm not sure, but between the air cleaner and the RH fender, there must be a large tube to suck fresh air. Again and again, most probably the shop manual has the answers to your questions. -
Roger's handcrafted 1:12 scale models
Roger Zimmermann replied to Roger Zimmermann's topic in Our Cars & Restoration Projects
Fortunately, I found the wiring diagram I did in 1980 for the motor actuating the headlamp/ headlamps and tail lamps. I intended at that time to let run the motor for the headlamps with 2V and the lamps (in serie) with 6V! Why do simple when you can do complicated? Indeed, I will do 2 separate circuits: one for the engine with 6V with its distinct connector at the fuel tank (like I did for the Mark II) and a connector hidden into the trunk for 3V. This will power everything except the traction motor. Of course, I have now to modify the way each separate bulb is fed; they will all get 1.5V; therefore there will always be a group of 2 fed in serie: 3 groups in the trunk for the tail lamps, 1 group each for the headlamps and one group for the parking lamps. There is a reason why I’m separating completely the circuits for the traction motor and the other electrical devices: if all would be connected with 6V with the corresponding voltage reducer for the window motors, the traction motor would be absorbing current without turning. To let it run, I have to “give gas” by pushing the accelerator; then, when the accelerator pedal is released, the engine is idling (but it does not start in this position) and I could demonstrate that the windows are going up and down (maybe!). However this situation does not please me. -
Roger's handcrafted 1:12 scale models
Roger Zimmermann replied to Roger Zimmermann's topic in Our Cars & Restoration Projects
Maybe, but on my project I have to take a magnifying glass to see it! Anyway it does not make any difference working on a 1:1 car or scale model! -
Roger's handcrafted 1:12 scale models
Roger Zimmermann replied to Roger Zimmermann's topic in Our Cars & Restoration Projects
Mike, you are quick to react!


