


Roger Zimmermann
-
Posts
3,130 -
Joined
-
Last visited
-
Days Won
24
Content Type
Forums
Gallery
Events
Everything posted by Roger Zimmermann
-

Roger's handcrafted 1:12 scale models
Roger Zimmermann replied to Roger Zimmermann's topic in Our Cars & Restoration Projects
The hood was sanded and installed. If the picture is dark, it’s on purpose because the one with a good light was less effective. You can compare the hood with the front fender’s sides; these curved surfaces will not be sanded and buffed because the risk here is too great to go through the clear coat. The floor mat structure was also installed; its shape is an elegant design as it makes an uninterrupted line with the dash. The junction can be seen on the picture; it’s the spot near the heater outlet. I will put some black leather paint to have it less obvious. The rubber mat itself is not yet glued on the metal part; on the picture the fit near the gas pedal is objectionable.

-
When you are at this or that, you can remove the bumper, front fenders and so on and do a complete overhauling!
-
1950 Crosley Farm O Road Restoration and more
Roger Zimmermann replied to dalef62's topic in Our Cars & Restoration Projects
I concur with the others! -
Roger's handcrafted 1:12 scale models
Roger Zimmermann replied to Roger Zimmermann's topic in Our Cars & Restoration Projects
Either you have to put glasses or take stronger ones! -
Roger's handcrafted 1:12 scale models
Roger Zimmermann replied to Roger Zimmermann's topic in Our Cars & Restoration Projects
The clamps are now added to the upper radiator hose; it was time after so many years without them! I had a look at the hood lock; I cannot resist showing it to you, with the lock itself on the passenger side and the security catch on the driver side. Both are released by pulling the catch lever through the bumper aperture, like the original. Before the hood can be installed, I will sand and buff it to remove the orange peel. I did this treatment to most of the body. The orange peel can be clearly seen on the attached older picture.


-
There was another thread from Matt, about a Lincoln. Suddenly, that thread disappeared.
-
I found my luck (maybe)!
Roger Zimmermann replied to Roger Zimmermann's topic in Our Cars & Restoration Projects
It seems that my waiting is coming to an end: Brian has more or less finished the car; a shipper is already involved. I hope that the shipper will come this week to Brian's place to take the car. -
Roger's handcrafted 1:12 scale models
Roger Zimmermann replied to Roger Zimmermann's topic in Our Cars & Restoration Projects
Installed the front bumper back. Not quite easy because I have no captive nuts inside the frame. Instead, I silver soldered studs on 4 plates. To secure the bumper, I glued first a bit brass to both rear most plates and inserted that assembly in the frame’s channel and searched for the hole. When I found it, I pushed on that assembly to let emerge the stud and put the nut on it. Then I did the same with the front place using the same procedure.
-
Quite a bit iron to hold that compressor!
-
Roger's handcrafted 1:12 scale models
Roger Zimmermann replied to Roger Zimmermann's topic in Our Cars & Restoration Projects
As the trim in the trunk is ready, I think it would be time to go into the passenger compartment. As the carpet was destroyed when I began this overhaul, a new one must be done with velvet, as usual. I first covered the floor with paper, cutting the excess to have a pattern to cut the velvet. I did it in one piece; I saw later from my pictures that originally I did it in 2 pieces. The main concern with that carpet is to cut away as exactly as possible the indentation which will be occupied by the chrome/rubber trim under the driver’s feet. This time, I used a not too strong glue in case the carpet must be removed in a distant future! With the carpet installed, I could assemble the side arm rests in the back as well as the fillers between the side trim and seat back. Those fillers are attached to the side panel with two screws, but they can only be installed when the side panel is secured to the body. The last picture is showing that detail.

-
Yes, paint is expensive, especially when you consider 100'000 units or one million. Why should the manufacturers paint what is not seen? Do you know many people who remove the trim parts from their new car just to see if enough paint was used? Not many, I'm sure! In the mid-sixties, I was working in a body shop. I remember there was a not so old Studebaker Hawk; I had something to do under the dash. There was no paint, not even surfacer, there was just raw steel! European vehicles were better protected (they were smaller too, using less paint) and they were unibody at that time. With a car having a separate frame, rust is not a big issue, it's just ugly. There is still a difference of quality perception between Europe and the USA: two or 3 years ago, there was a recall on some Cadillac cars; the dealers had to replace the drive shaft, I don't remember why. There were two drive shafts: one for the domestic market (the USA) and one for the export market. The difference? The shafts for export were painted.
-
During the preparation for the paint, I checked if most of the trim parts would fit. The rear bumper had also to be temporarily installed to check the aperture. July 1998: Once I was ready with the outside of the body, I could spray some paint on the inside panels. I know that the factory did not paint inside parts so much, but once I have a pray gun in the hand (and enough paint) I'm not to be stopped!


-
Roger's handcrafted 1:12 scale models
Roger Zimmermann replied to Roger Zimmermann's topic in Our Cars & Restoration Projects
Thanks Mike! Indeed, on this model, it was the first time I attempted to scale down locks. The ones for the doors are as perfect as it can be at this scale, they are functioning as intended, with 2 stages like a real one. The trunk lock is not so perfect. Retrospectively, when it failed last week, I should have it completely redesigned. Indeed, I "just" did what was necessary for a correct function, but it's not my best. -
Roger's handcrafted 1:12 scale models
Roger Zimmermann replied to Roger Zimmermann's topic in Our Cars & Restoration Projects
As the trunk’s inside is done, I found it was the time to install the lid. Only 4 screws and it’s done. Really? Well, I went just a hair away from the catastrophe: Since I did the paint many years ago, I had to slam the trunk lid to close it. I expected the same after the lid installation. It was, but I had to slam the lid much stronger. I did various experiments to improve the issue, all failed. The last slamming was almost fatal: I could no more open it: the “key”, in fact a screwdriver, went to the maximum rotation but the lid stayed closed. Trying to open it with a lot of force stayed without result. However, after a while, by lifting one end of the lid, the lid disengaged itself from the lock, without damage other than my ego. It was obvious that I had to remove the lock to see what’s wrong. Of course, I had to undo the trim near the lock…and I had to remember how, years ago, I installed the lock into the body. When it was out of the car, I opened it and saw nothing wrong. But, what is that small shiny bit of chromed metal lying on the desk? The first picture is showing the inside of the lock, without the cam. The lock is functioning that way: a cam, operated by the key, is pushing the detent lever. Obviously, I removed too much metal to that lever when I did the lock in the past century and, to save the detent lever, I soft soldered a very thin bit of brass. The bond decided to strike and the cam had no effect anymore. With a new detent lever, that misshapen is now solved. I also had to elongate the holes in the body to position the lock assembly higher. I can now close the lid without to slam it. The last image is the “new” lock, with some grease to lube it.

-
Roger's handcrafted 1:12 scale models
Roger Zimmermann replied to Roger Zimmermann's topic in Our Cars & Restoration Projects
Well, Pat, humoristic posting is sometimes difficult to understand when one is speaking a different language. Unless it's really a plain joke, I hardly take a chance to write something humoristic, I'm lacking the finesse of English. As I published the pertaining document, it's the proof I completely misunderstood your comment! -
Roger's handcrafted 1:12 scale models
Roger Zimmermann replied to Roger Zimmermann's topic in Our Cars & Restoration Projects
Pat, the spare tire in the model is at the same place the original spare is installed, see the attached page from the owner's manual.
-
Oh boy! This is something I would never undertake myself. You must have a minimum of knowledge to do that.
-
Roger's handcrafted 1:12 scale models
Roger Zimmermann replied to Roger Zimmermann's topic in Our Cars & Restoration Projects
The spare wheel had to be secured in the trunk compartment. From the owner’s manual, I did a bracket, a strut which is anchored at the channel under both “Y” and a nut. From my old pictures, there is a cardboard on both sides of that structure. There is nothing in the middle; the spare wheel is hiding the view to the seat back’s construction. For a luxury coupe, the trim in the trunk compartment was minimalist compared to what is done now on most cars.

-
Roger's handcrafted 1:12 scale models
Roger Zimmermann replied to Roger Zimmermann's topic in Our Cars & Restoration Projects
Sure, but it's not so far away from the rear bumper. In the case of the Toronado and/or Eldorado, the spare is more than 1 meter away from the bumper, and heavy on top of that! -
Yes, as I wrote, I was alone. No one to help in worse case!
-
Roger's handcrafted 1:12 scale models
Roger Zimmermann replied to Roger Zimmermann's topic in Our Cars & Restoration Projects
With the trunk space free from wires, it's time to put some trim to hide the body work (in my case, not to protect it!). I still had some thin felt I used in the Avanti trunk. To be more authentic, this material should not be black but dark grey as some pictures I did in 1966 or 67 are showing it. From my 3 scale models, the Toronado will be the sole one to have a full size tire/wheel stored. The wheel well's inside diameter from the Avanti is too small to accept the tire; the wheel well from the Mark II is not deep enough or the tire has a too large diameter; I had to remove some rubber at the bottom to store the wheel. How is the spare wheel stored? Should the inner side be towards the rear or to the front? The owner's manual in the background was a nice help to solve that problem: the spare wheel is stored the same way my picture is showing it. Anyway, in a case of a flat tire, to extract that spare wheel from it's position must not be very convenient!
-
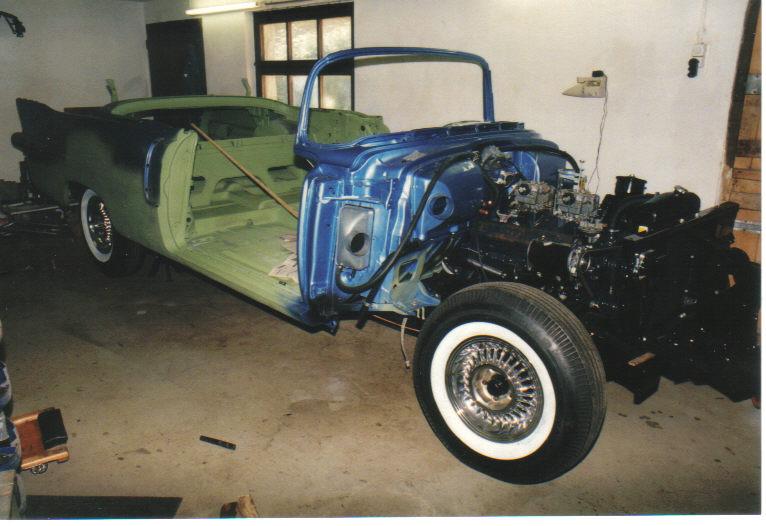
The great day arrived! On April 12 1997, I could put the body on the frame. The way I did it was a little bit criminal with blocks of wood on top of the jack stands. I had to go under the body to lift it and put the wood blocks on the other side as the body was near to the wall. Some say: to make life interesting, you have to take one risk each day. With this, I took a risk for the whole year! Fortunately, even if the whole was very unstable, nothing happens. Eyes must be overall: is the frame in the middle of the body? nothing is touching the body? (especially with my "construction") engine? transmission? At the end of the afternoon, the body was on the frame, attached with the screws.It began again to look like a car! The next step was to assemble all the body parts and begin with filling, sanding, etc. A long and annoying work.


-
Roger's handcrafted 1:12 scale models
Roger Zimmermann replied to Roger Zimmermann's topic in Our Cars & Restoration Projects
Thanks Mike! It seems that I forgot to write that the lower part of the gas tank is removed. This is the reason why the tank on the picture is strange looking. Plus, the remaining part is not centered on the underbody. It's that way because I have to continue the electrical job. -
Roger's handcrafted 1:12 scale models
Roger Zimmermann replied to Roger Zimmermann's topic in Our Cars & Restoration Projects
Thanks keiser31, but which sentence do you mean? -
1950 Crosley Farm O Road Restoration and more
Roger Zimmermann replied to dalef62's topic in Our Cars & Restoration Projects
Probably te bottom was not perfect when the car was new...


