


ROD W
-
Posts
784 -
Joined
-
Last visited
Content Type
Forums
Gallery
Events
Posts posted by ROD W
-
-
There wouldn,t be too many of these around. Would have to be one of my favourite years and styles, with the built in trunk. On Ebay at the moment. Wonder what the reserve is.


-
 2
2
-
-
Kyle, Get back to work on that 25. Remember where not getting younger.
-
1
-
-
My 1920 has the screw down grease cups.
-
1
-
-
There are a few early 20,s Buicks on Ebay at present. A nice light blue 21 roadster, This dark blue one, looks like a nice 22 tourer. These 1918,s were advertised a year or more back. back on the market again. The one with the dark green body is actually a 1919.


-
Mark, Buick started production of their 1922 Models in August 1921.


-
Wow, What a challenge. Its hard enough when you have all the right parts.
-
2
-
-
Any idea,s

-
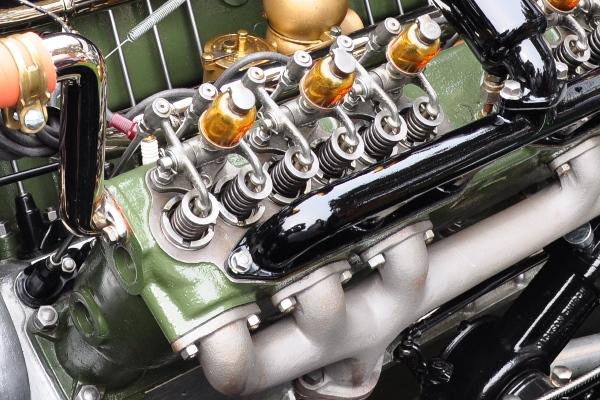
I wonder why they didn,t put those oilers on all their engines.
-
Found this on the wood under the front seat. Being 1925, this was the first year Buicks were painted in Duco Lacquer

-
6
-
-
1919 _ Metal panels covered all engine moving parts, where as 1918 had a fully exposed engine. Round ignition and light switch compared to the rectangular pull push switch of 1918.
1920_ Virtually identical to 1919
1921 _ New streamlined body shape, with higher hood and cowl running straight through to doors rather than turning up at the windscreen. curved windscreen pillars rather than the straight pillars of 1920.
1922 _ Six cylinder cars, Identical to 1921. 4 cylinder cars reintroduced (engines had separate head and block, ) where as the 6,s still used the caged valves.
1923 _ Crown fenders and drum headlights introduced. Six cylinder open cars had a rectangular rear window instead of the oval window used previously. Last year for the caged valves engine.
1924 _ New body shape with the Packard style radiator shell, in both the 4,s and the 6,s. Wheel bases increase to 120" and 128" on the 6 cylinder cars. New six cylinder engine of 255 cu inch with detachable head. Introduction of 4 wheel brakes on all models. Last year for the 4 cylinder cars
1925 _ Introduction of the new small 6 cylinder car with a 191 cu inch engine, on a 114" wheelbase chassis. Called the Standard Six.. The larger 6,s now being called the Master Six. This was the first year enclosed cars outsold the open cars. Round intake manifold compared to the square manifold of 1924.
1926 _ Engines on both the Master and Standard were increased in size to 207 cu inch and 274 cu inches respecively. Clutch changes from the discs having tabs on the side to having splines all round. The radiator shells had a more rounded contouer than in 1925. The single starter/generator that Buick had used since 1914, was replaced by two separate units. An air filter was introduced. There was now no left and right headlights, instead the lights were mounted on the bar running between the fenders. This year was Buicks highest production, of 266,753 and would not be passed until 1940.
1927 _ Very little change to 1926. New rubberised engine mounts. One piece windscreen.
1928 _ Some one else will have to continue for 1928 as I have never had a 1928. I have not seen Dave B with his 28 on the forum for a long time .
-
3
-
-
If it was a six, I,d be seriously tempted
-
the Spider/Hub does not move. It is held in place by a metal ring attached to the front of the Hub. When the gearbox is installed, the clutch shaft / input shaft pushes against the ring preventing the hub moving backwards. It gets very little wear as most of the time it is turning with the flywheel. Only when the clutch is depressed, dissengaging the discs does it slow for easier gear change. Thats why we use heavier grade oil in the gearbox to slow the hub and gears. The metal ring can be seen in the bottom photo, at the front of the hub/spider


-
1
-
-
roadmaster 29
These are a very simple carb. They are designed to run at a very low pressure, But saying this, many people successfully run their cars with fuel pumps. This is a pic of a 1920 carb, but the 26 is basicaly the same. It may be as simple a putting in a new cork float. The float lever may be worn, causing the float valve to stick. If it was me I would remove and service the carb after buying the car anyway. The 26 has a heat riser which has an internal tube that develops pin holes over time. This does not cause flooding but severely affects the running of the engine, also the air valve may not be closing properly. There are topics on this Forum discussing these issues

-
1
-
-
-
The book Seventy Years of Buick by G H Dammann lists most of the changes as per model year. About the only years where there were not changes in the teens and 20,s was 1919 to 20 and 1921 to 22. But even saying this in 1922 Buick reintroduced the 4 cylinder line.
-
2
-
-
Very nice Terry.
-
Hugh,
Would you be able to email that service and assembly paper to me. rodwise32@yahoo.com.au
-
Chuck,
Love your car. As Hugh said, the best would be to remove the steering column and box to overhaul. But if you want to keep it simple at present, you could remove the steeriing arm. Turn the steering wheel till it is at the centre of its travel. One steering box of mine has two turns lock to lock and another has two and a half turns. Ensure the wheels are straight ahead and and reconect the steering arm. If this doesn,t rectify the problem you will need to remove the box, as it has been assembled incorrectly. On assembly the half nuts need to be positioned so they have equal travel both ways. There is also a left and right. There is a large nut at the top of the steering box for removing play in the steering, But if you tighten this to remove play when the wheels are straight ahead, the steering can become hard on full lock, as most wear occurs in the centre of the half nuts. I use a heavy oil in the steering box, but I,ve heard others on this Forum use a semi fluid grease. Others will chime in to which is best.


-
1
-
-
Is the suction valve shutting off properly in the vacuum tank. Try disconnecting suction line to manifold and putting your finger over the end. Just a thought.
-
Got all the doors on, ( swinging on there hinges ). Adjusted the hinges at the front of the back doors, to get the correct gap. Moved the tub forward about 1/4 inch to get the gap right at the back. Welded a tab onto the tub support bracket, to provide extra bracing, as the model 55 bracket, only has a small foot, which does not provide the support that the larger bracket does on other models.


-
2
-
-
Leif, Here,s a 1931 reprint on Australian Ebay

-
Mark, Thanks for the photo,s. Its great to see a car coming out of hibernation. The car certainly looks in much better shape than the old trailer it was stored in. I guess keeping it up off the ground would have been a big factor. Keep us posted on your plans.
-
2
-
-
Just a bit of input from members of the Forum. If you wanted to use this car regularly on club runs, the front seat would not last much longer. As it is the original leather, what would you do. This car has been in the Victorian Buick Club for many years.

-
It not a 1920. Either a 21, 22? But it looks nice.
-
1
-


FS: 1918 Buick E45 Touring 5 Passenger
in Buick - Pre War
Posted · Edited by ROD W (see edit history)
Very nice. Looks like a good buy to me.