


RobV
-
Posts
71 -
Joined
-
Last visited
Content Type
Forums
Gallery
Events
Posts posted by RobV
-
-
Lenny,
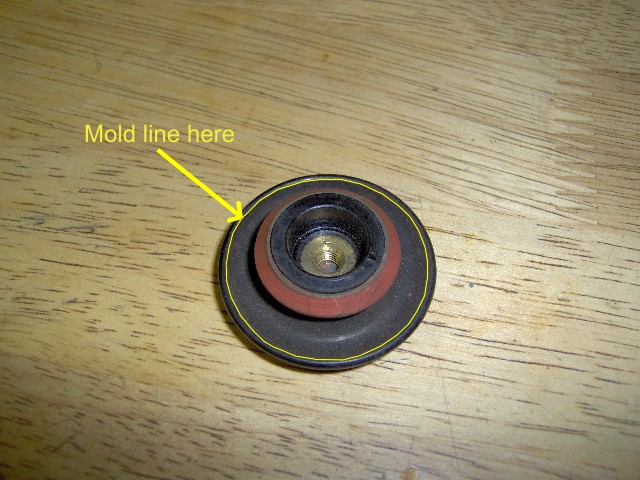
The pic of my rear lock block. It's fuzzy, but thats what I get for taking a pic after downing an energy drink.
-
Yup, urathane. I tend to work with Alumilite Corp products a lot for reproducing parts. They have a bunch of different compounds, including various density rubbers for reproducing molded gaskets and such. Of course, I do have some water clear acrylic if I wanted to make some really interesting buttons.
-
Well, thats always a possibilty. It means I would have to clean the chips from the current project off the lathe and mill though. Ugh.
Not having held one in my hand to see, why do you think it would be easier to machine than mold?
-
1930, the shape isn't bad, it would be a two-part mold. From what I can see, the mold line would be at the widest circumference (about where you can see the lip on the bottom view)since there is already a cast line there. I would put just enough bees wax in the threads of the brass insert to fill them, but leave the diameter of the thread open. That creates a center 'plug' on the mold to hold a new insert for casting the new button around. The only concern is if the fiber washer is attatched or removable from the knob. I would assume removable, but I'm usually wrong.

-
If I can find one, then I will make a silicone mold for it and can cast them as needed. The nice thing about the molds is the detail they can capture. I made some of a 1970 Barracuda emblem for a friend and managed to get the factory mopar numbers and logo on the back of the emblem to cast cleanly.
What color/s is the bakelite? I try to remove and preserve all my original bakelite stuff because of the way it tends to crumble and disintigrate with time. I just cast new reproduction knobs for another friends car.
-
1930,
Thank you! very detailed, even wire diameters for the spring and clips. Now I can start making some parts. What material is the horn button made from?
-
Ooops, if all editions are the same then it seems I have stepped on Romar's toes.
Gundog, what version of IE are you working with? you can find it in the 'help -> about' tab at the top of your browser.
-
1930,
I'm interested in all of it.
Actually, whatever pics or diagrams you have readily available. I don't want to be a pain in the arse.
-
1930,
Thanks for the pic, I can see what goes where now. I would appreciate being able to see the diagram you have. Do you also have one for the horn assembly?
I'm a hobby machinist, and can replicate just about anything I can see and measure, or have technical drawings for. I just got through making some 3 piece dies for a small local injection molder, so I don't think that horn pieces would be too much of a challenge.
-
Vern,
The reprint you show for sale online is the first edition may 1929, that's what the pic of the book shows. The copy I'm posting is the second edition. I checked online before I posted this copy to make sure I wouldn't 'step on any body's toes' as it were. If I have done that by posting a different edition, I apologize.
-
Lenny,
I'm in the process of replacing all of the tires on the car so I will take a couple pics of the lock mounts without a tire in the way. Also, I will measure the rod and get those posted with the pics.
Rob
-
Thanks, I'll check out Romar. I'm trying to clean the dash up, since it seems all of the original switches are buried somewhere or missing. I found the lighting switch, and brought it back to life. Now it's the starter, and then the horn when I can find a button. Since I can't find one, I may have to make a die set and manufacture my own button on the press.
-
Does anyone have the original starting switch configuration on their car that can advise me, or post pics? It would appear after looking in the book that my entire starting mechanism is missing. I am starting it with a push button under the dash for now. I would like to be able to use the original start knob.
-
Ok, I got around to the Cooling, Fuel, and Electrical sections. Those are posted and ready for everyone.
-
If your car has a fuel pump, then from what I remember, the float has to be set with the proper pressure on the feed line.
-
Lenny,
Well they aren't cheap, but Vintage has them. http://www.vintageandclassicreproductions.com/Dodge.htm
Look under the 29 DA section and it's part DOD-139. They only show the lock section, but if you need, I can give you the length and diameter of the rod that is pinned to my locks. It wouldn't be hard to cross-drill a piece of rod and pin it to the lock.
On the bright side, they are in Oz, so you would save on shipping time
-
Lenny,
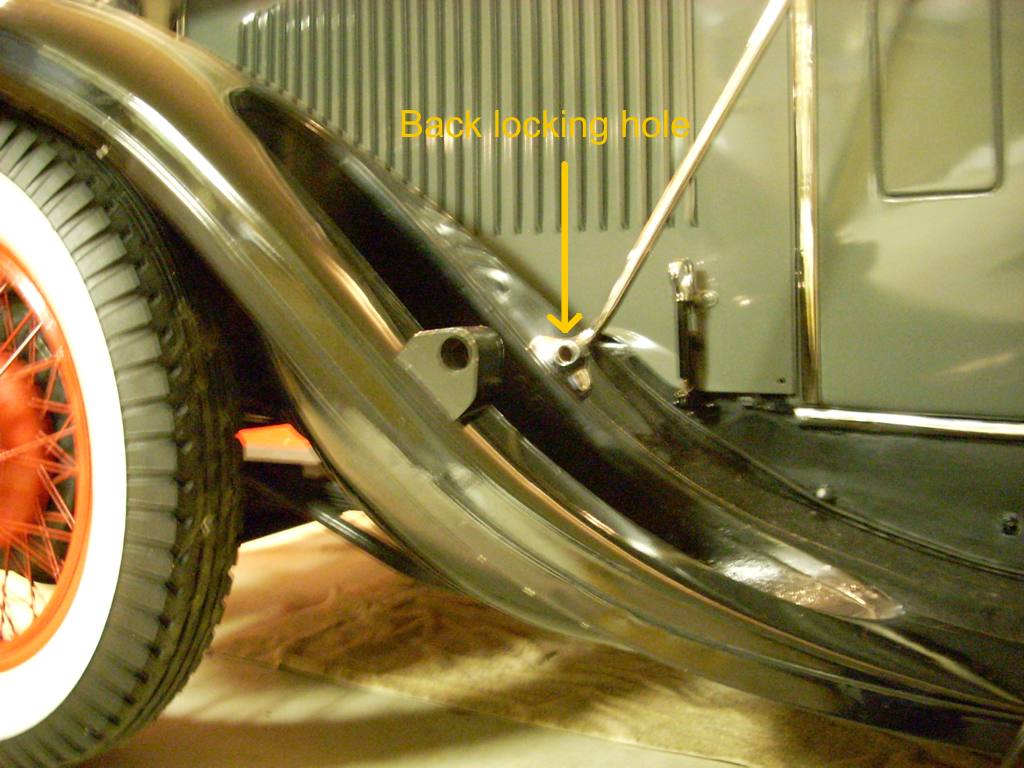
The front block, I assume, is the one to the outside of the fender. The lock on my '29 Deluxe slides into a hole at the base of the vertical spare wheel support on the backside of the wheel. So, the rear block is the support itself.
I saw a reproduction lock assembly somewhere, I'll see if I can remember where.
Rob
-
DDeluxe,
What model Stromberg? I just set the float on my '36 Packard a couple weekends ago. Should be about the same if the model of carb is the same.
Rob
-
The DOT5 I get (which should be no different than any other DOT5) is purple in color. DOT3 is clear or yellowish. However DOT 5.1, which I have never seen in person, is supposed to be 'crystal' clear.
Don't mistake your DOT 5.1 bottle for your water bottle!
-
1930, The wires will work with straight rods like in your picture. The two locks I have with my car are straight. If you look at the pic in the link I posted above, you can see that if I rotate the wheel just a little I have a straight shot through the spokes to the rear mount. The rim sits low enough to clear the rod.
-
The front seat flips forward, but there aren't any hinges or anything. In fact, when I work on the interior or pull the floorboard out, I just remove the seat from the car completely. The toolbox is divided I think....
I'll check and take a pic, lol.
-
Toolbox? Not that I've seen. I store everything in the bins under the seat. I think I even have the crank handle under there somewhere. Unless those under seat bins were considered the toolbox?
That trough is big. It's about 2 feet long, a foot deep, and maybe 6" wide. It has a half inch drain line going out the bottom of it. It made sense to me when people told me they would put ice and drinks in there.
-
The 'Preface', 'Inspection and Care', and 'Engine' sections are uploaded and ready.
-
For all the DB 6 owners out there, I'm making a PDF document of my original book. It's the second edition printing from September 1929. There is a ton of information in here and it may take a while for me to get the whole thing scanned. I'm going to create it in sections to keep download times somewhat sane. Heres the first part, the cover and table of contents. The file manager won't allow me to upload a PDF, so you have to get it from the link.
Dingy discolored cowl and head lamp reflectors
in Dodge & Dodge Brothers
Posted
The cowl and headlamp reflectors on my '29 are badly discolored in spots. I was getting ready to re-silver them, but I wanted to make sure that the originals were silvered and not nickle or some other metal first.
The corrosion looks just like the bad oxidation I get on my other silver work.
Thanks,
Rob