


in2antiques
-
Posts
72 -
Joined
-
Last visited
Content Type
Forums
Gallery
Events
Everything posted by in2antiques
-
Thanks Roger, I appreciate your fast reply. I’d never looked at this area before having this problem, so didn’t have anything for comparison. I believed the pin must stick through both sides of the crank to engage with the engine. However, if I peen over the small end, only one side would engage, correct? Thanks again, Dave
-
Hi, I'm looking for help - I drove my Liberty Brush for a Thanksgiving tour but discovered I couldn't crank her over when it was time to come home, as the "pin" in the hand crank had fallen out somewhere along the drive. This is a tapered pin, apparently press fit. I found a mechanic who can reproduce and install it for me but would like a picture or dimensions of a good one if available. Is it simply tapered, or is it flat on the ends to engage the engine? If anyone can help, it would be greatly appreciated. Please see the attached pictures. Thanks in advance, Dave
.JPG.80256c40487bf2e172d954d6fcebadc6.JPG)


-
Wheeler-Schebler Model FA Carburetor
in2antiques replied to in2antiques's topic in Model T (and older)
Hi Mark, thank you for your reply. I’m learning quite a bit about this carburetor on my vehicle. I’d not driven my Brush in 8 years, and had forgotten that applying the brake pedal also engaged the clutch and applied the brake. As it turns out, my brake pedal was slightly depressed, significantly limiting my speed. That’s been corrected, and I made some minor adjustments to the carburetor and it seems to be running fine now. i’m always thankful for this forum though, as it’s a fantastic source for expert information. Again, thanks! Dave -
Wheeler-Schebler Model FA Carburetor
in2antiques replied to in2antiques's topic in Model T (and older)
Hi Jon, Thank you! I really appreciate your very fast reply to this post. It’s hard to find information at times and it’s great to have some experts like you to provide assistance. The brush is supposed to have a five ball carburetor, but I know this particular one has been on the car since at least 1959. Again, thank you, Dave -
Hi, I have a Wheeler-Schebler Model FA carburetor on my 1912 Brush. Although it’s not original to the car I know they usedvthem on model T Ford’s (which I also have) so I’m looking for help in this forum. The car doesn’t run well past an idle. I saw there are two adjustments on the top of the carb and believe one is adjusted for high speed or fast idle. I could play with the adjustments but was hoping somebody could tell me which adjustment of the two adjustments is which. Below is a picture I found online of one identical to the one on my car. I also found a little information on the following site: http://www.mtfca.com/discus/messages/50893/74692.html?1228737946 Your help is greatly appreciated. Thanks, Dave

-
First time out of the garage in seven years! I’ll start her next week.


-
Hi, i’ve been collecting Brush advertisements for a number of years. I sent over 70 ads I’ve collected from turn of the century newspapers and other sources to your email address. Many are undoubtedly duplicates of those you might have, but I hope you can use some. Dave
-
Hi Skip, thank you! I’ve decided to use a small 12v AGM battery, which I understand, won’t leak. I like the idea of a wooden box and think this sounds like the best solution. The box can then be secured to the floor with ease. Of course, there’s little chance of tipping anyway, with such a small area under the seat, and running at “Brush” speeds, but will move forward with this plan. Again, thanks! Dave
-
Hi Simon, thanks. I wasn't sure if I should secure it with a standard battery hold down such as this, or perhaps something that looks a bit more vintage. It is, after all, hidden. Someone suggested I use a strip of wood that closely matches the finish on the car, and use run it across the battery and use hold down (rods) similar to those in the picture you shared. I wasn't sure if there was a standard way of doing this? I wonder what they did from the factory? Anyway, thanks! Dave
-
I'm getting close to having my Liberty on the road. I have a question about securing the battery under the seat. The prior owner had used a bungie cord to strap it in place. I'm looking for better ideas. Can someone please provide a picture showing how to properly secure it? Many thanks in advance, Dave
-
Hi, you might try Nostalgic Reflections for a script. I sent them pictures of a "Liberty" script and they manufacture one for me. I was fortunate to have seen an original script and had exact measurements, which was helpful. Not cheap, but can't wait to finish my (cosmetic) restoration and put on the radiator.
-
Regarding the wheels, I’m uncertain of current costs, but had new wheels made by Stutzman’s Wheel Shop in Baltic Ohio a few years back. Noah Stutzman does excellent work and as I recall, fairly reasonable. You can Google his phone number.
-
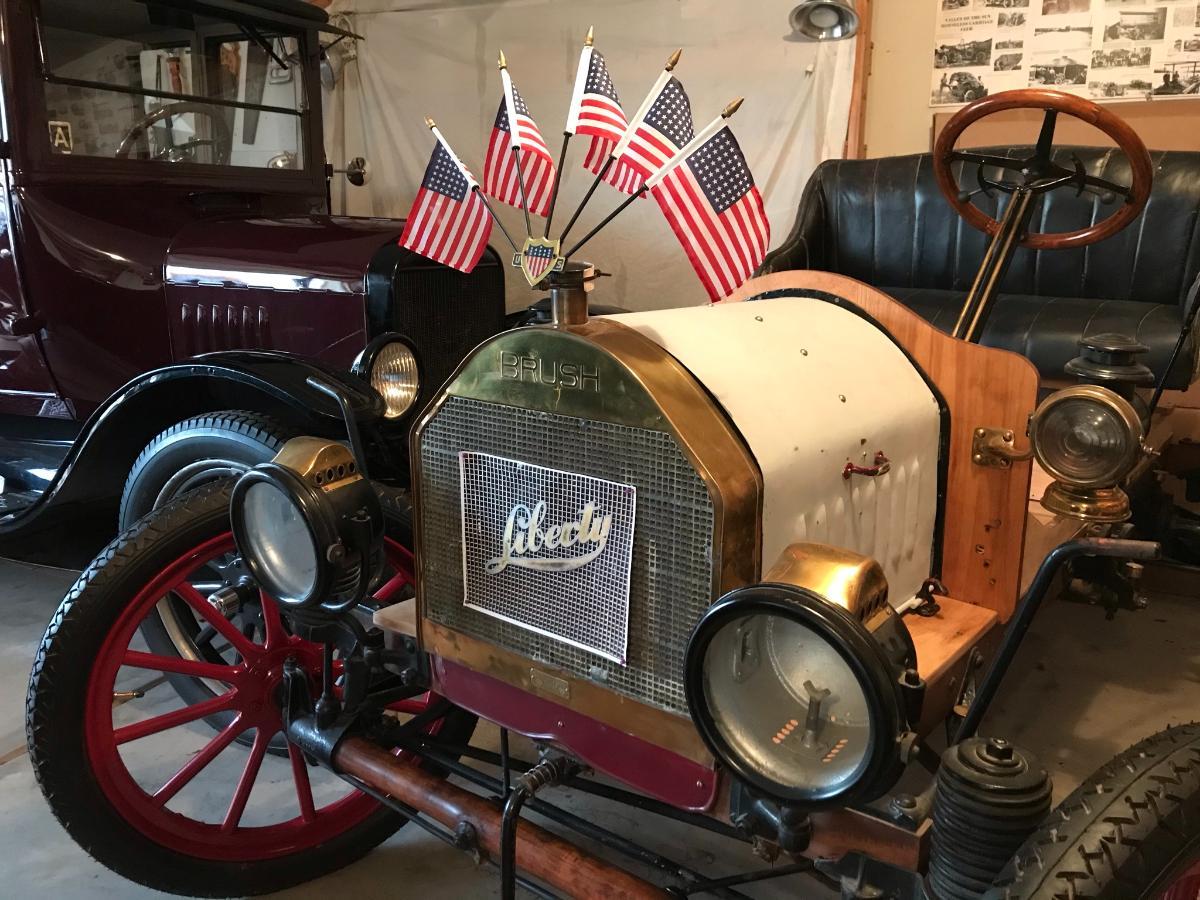
A few of you have asked for picture of my 1912 Liberty. First of all, I need to say that I never intended to do any restoration whatsoever. I have (or had) few mechanical or other necessary skills. I simply became infatuated with 1 cylinder cars and was on the prowl and came across this incredible vehicle. I purchased her in late 2013 and received assistance in identifying the model through this website. It had been titled as a 1907 which was clearly wrong. Many folks offered comments on the "incorrect" seat, lights, radiator, and rear tail light, but with a 100 year history, I didn't care. She'd had a complete lack of attention for many years but shined up nicely, as seen in the below pictures in front a nearby barn. A letter that accompanied the vehicle explained some of the incorrect details, noting the Liberty was a last ditch effort to compete against 2 and 4 cylinder models and they were grabbing parts from where ever they could to complete them. Whether true or not, it mattered not. Once I had her correctly licensed and titled, she was ready for the road. The transmission wouldn't pull the car, so a friend machined shims and we were on our way. I enjoyed few dozen drives, totaling about 40 miles in the old gal. When the 60 year old tires went flat and the the original wheels came apart, she had to sit for a while. New wheels came from Stutsman's Wheel Shop, and I purchase new tires. During the down time, I made a fateful error of wiping the body down with linseed oil. I expected it to soak in, but it took forever to dry and thickened into the consistency of sap. The car sat for the next 4-5 years while I decided next steps. Other factors also delayed my actions. The car had been rebodied in the 1950's with no access to the top of the transmission or differential. The fenders may or may not be original but I decided to keep it as purchase. I finally decided "it's time". Please note that this is and will be a completely amateur "cosmetic" restoration. I tore the body down and sanded to bare wood. The hood and fenders were extremely rough. The prior owner said he didn't care for bondo he'd found in the hood and took a hammer and beat the devil out of it and painted it yellow. I have dozens (perhaps hundreds) of hours straightening each. We decided on a Red, White, and Blue finish. The wheels are now red, the inside of the body is natural wood (stained and varnished) and the outside will be a deep blue, as well as the seat back, fenders and hood. We haven't figured in the "white" areas. Perhaps pinstriping. I made a few modifications to the body to allow access to the undercarriage, so I can properly service these areas. I also found the original oiler, re-corked it, and it's ready to install. This has all been a learning experience. Here are a few pictures, starting with the original purchase (which looked great, but wasn't very drivable). Pictures taken in front a bard were from one of my last drives. The tires and wheels came apart on the way home. She's ready for paint, so next pictures will show some dramatic changes, or so I hope. Dave Dave
.jpg.918bc575e63269f8838183e3245ed1fd.jpg)
.jpg.706094db83865425a8c335ee2bfc3b2a.jpg)
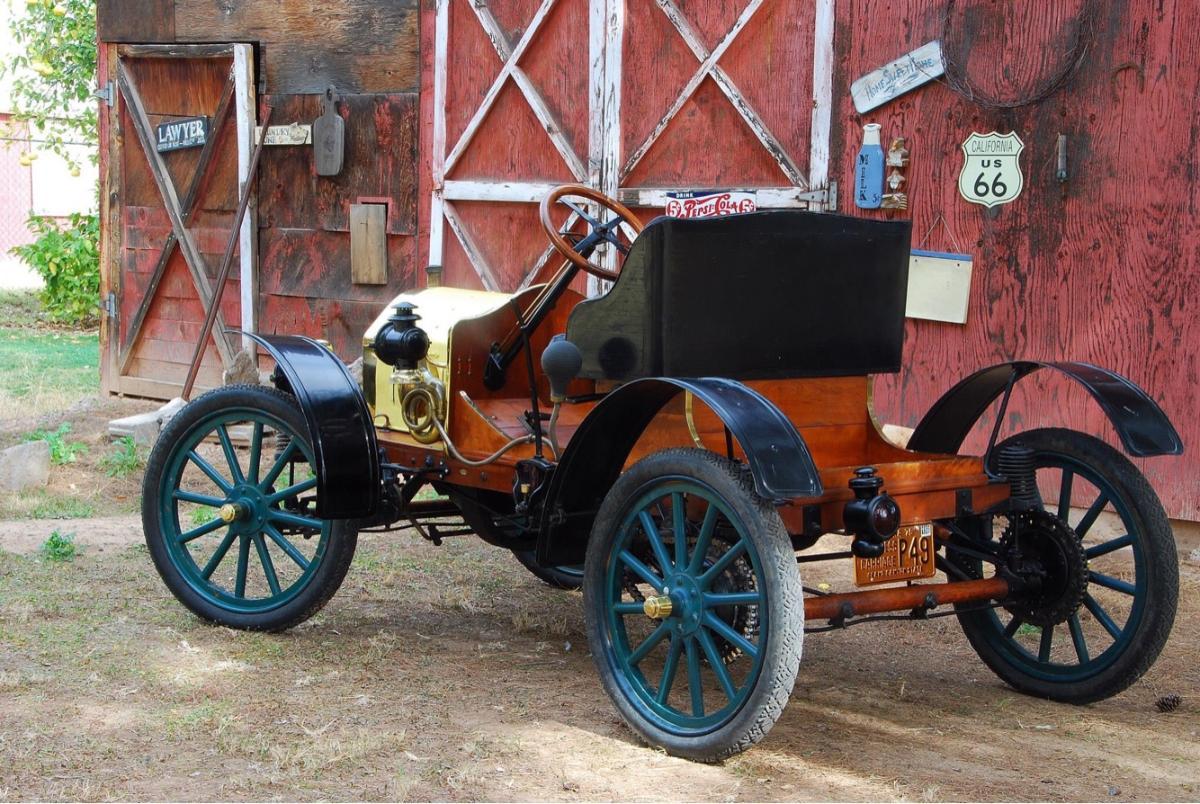

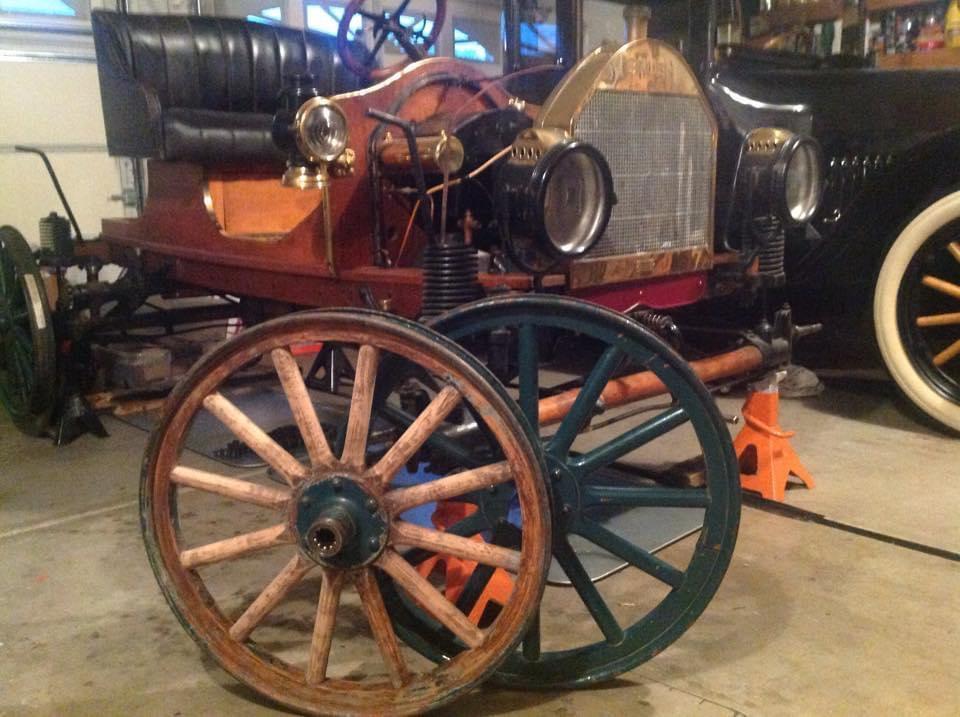


.JPG.f900ae4869fac0e2c74ae1d03a32fdd9.JPG)


-
Thanks for the advice. Rather than wasting my expensive paint, I better hit some stores for some cheaper brands and practice. The folks at the automotive paint store where I purchased my paint had no idea about painting wood. I guess the young folks working there have never seen or heard of a wooden bodied car. It's coming together though, and I'd love to start driving her soon.
-
Hi Everyone, I'm getting ready to paint my Liberty Brush. I have a good compressor and gun, but have never painted anything before, and especially, never automotive paint on wood. Any suggestions? Nothing fancy, but have already purchased a single stage paint I intend to use for the wood, fenders, hood, and seat. I'm mostly concerned about preparation and painting the wooden body. It's been sanded down to bare wood and awaiting my attention. Many thanks in advance, Dave
-
I figured it out. Put it together (left off a few insulators) just to be sure. Will make it permanent and rewire but still looking for a spare “just in case “.

-
Hi, I could use some help. I’m getting my Liberty Brush together and ready to drive. While rewiring it, I made the mistake of taking the ignition switch apart while I put new wires on it. It won’t go back together and I fear I need a new one. The box may not be original, is it smaller than any I’ve ever seen, but was with the car when purchased. I need another switch. I simply pulled up when starting the car and pushed it back down to kill it. Would anybody have one I could purchase or know or a resource? I just need the switch. Thanks, Dave


-
Hi Skip, forgive my very delayed response. Thank you. I've had several folks tell me "not Brush" on the lights, but they look nice and I honestly wouldn't have known the difference. I wasn't able to find any identification on them so no idea what they were from. I'll post pictures down the road when the car's back on the road. Hopefully, not too far down the road! All the best, Dave
-
Hi Skip, thanks for the additional information. I'll have a look over the weekend and let you know about the lights. I've had several folks tell me the lights are not correct, the seat is not correct, the wheels are not correct. Etc. etc. Others have told me that Brush was grabbing parts from anywhere they could to complete their last year production, and the 1912 liberty models had parts from Ford, Maxwell, and other manufacturers to complete the build. Mine has one of the last known serial numbers (engine SN), so anything's possible. At this point, it doesn't matter. I just want a nice drivable car. I'll share in later posts what I believe is original, and what's not, due to the paperwork I have and other clues I found. Attached is a picture "as found" when I was bringing it home. The prior owner said it was absolutely original, (except for the yellow paint, which will change). I had nothing to compare to and had never seen another with lights like this, but he swore they're original. I also haven't been able to determine what else they might have been on. I'd been searching for a one cylinder car for several years, and had never heard of a Brush until seeing the advertisement on the Horseless Carriage club website. I had to have it. As noted in my first post, I only drove it 30 to 40 miles and that's been many years ago. Can't wait to have it back on the road. Again, thanks, Dave

-
Hi Skip, Thank you so much for your reply. This is the only car I have with this type of set up for lubrication. It didn't appear that the dash has been altered, but I wasn't certain. What you said makes sense. If I have any problems hooking it up I may reply again, it'll probably be sometime after the holidays. Again, this car's been on blocks for about six years and I'm anxious to have it back drivable. Thanks, Dave
-
Hi Fellow Brush Owners, I purchased my 1912 Liberty-Brush in 2013 and drove it only a few times before the wheels came apart on me. I've since had new wheels made and purchased new tires, but she's been sitting for 6 years and I'm finally putting her back on the road. I have a few questions and will be posting questions as I go. When I purchased the car, the oil tank was mounted on the dash but the oiler was not. The previous owner said it leaked badly so he put the pictured Lunkenheimer Sentinel on instead. It's not correct for the car but fortunately, I have the original. I've cleaned it up and replaced the cork, so it should be fine. I don't know how it's installed though. Seems simple, as there are only 2 holes in the dash, the top one obviously connects to the tank, but the hole is rather large, and the nut passes right through. The only thing I can figure is that maybe it's used to adjust how far it goes to meet up with the oiler. If not, perhaps the top (larger) hole isn't correct. With the tank on the other side, I don't know how the nut would be adjusted or tightened. I'd appreciate confirmation if anyone can help. I'll assume I also need to find some type of gasket or seal to go between the oiler and the tank. Pictures attached; the last one is obviously the incorrect oiler, but showing how it went through the dash. Thanks in advance, Dave
.thumb.JPG.4572791c14d9e0545ab26a5f1c4b49a3.JPG)

.thumb.JPEG.6249dd323696c7b306359df4daeb5539.JPEG)


-
.
-
1921 Dodge Brothers Starting Problem
in2antiques replied to in2antiques's topic in Dodge & Dodge Brothers
I appreciate everyone's advice. I had several problems with the car. The ignition/light switch was draining the battery. Turning the lights on at any time would kill the ignition. I bypassed both of those with toggle switches and it now holds a charge and starts easily even with the lights on. I also purchased a condenser from Myers Dodge, and my restarting problems disappeared. We drove the car 50 miles on Saturday with no problems. At the end of our drive it stalled at an intersection. I couldn't believe when I wouldn't restart, but then found a broken wire under the dash (from the floor starter switch). Fixed, and on my way. The carburetor is running very rich and I believe it's stalled after flooding. One way or another the problem with not being able to start when hot has been fixed. Many thanks to all who posted on the site, Dave -
1921 Dodge Brothers Starting Problem
in2antiques replied to in2antiques's topic in Dodge & Dodge Brothers
Thank you! I don't see an easy way of removing it, but perhaps it'll be evident when I see the new one. -
1921 Dodge Brothers Starting Problem
in2antiques replied to in2antiques's topic in Dodge & Dodge Brothers
It appears my electrical problems may be resolved regarding the battery drainage. Toggle switches seemed to have worked. However, I'm left with the problem of a car not running. I suspected when it gets warm the condenser may be failing. Typically, after running it for 10 minutes or so and shutting it off, I can't start it for hours afterwards. I tried again this morning. It started with ease snd I let run 15 minutes, shut it off, waited five minutes, and haven't been on able to start it since. It'll fire but then immediately die. Remove the distributor cap, manually operated the points, and verified a fairly good spark from the coil, although I don't have a comparison for the size of spark. I'd like to change the condenser, but don't know how to remove it (see attached picture). I understand an exact replacement isn't available, so what does everyone use, and how would it be installed? Any other ideas? Thanks in advance.
.JPG.80256c40487bf2e172d954d6fcebadc6.JPG)


.jpg.918bc575e63269f8838183e3245ed1fd.jpg)
.jpg.706094db83865425a8c335ee2bfc3b2a.jpg)


.JPG.f900ae4869fac0e2c74ae1d03a32fdd9.JPG)


.JPG.2812320dfaf533202a619d1e5f261499.JPG)

.JPEG.3d263f4014a16977fd2e35801c337e44.JPEG)


