Blayze
-
Posts
65 -
Joined
-
Last visited
Content Type
Forums
Gallery
Events
Everything posted by Blayze
-
Well at least she was able to play in the snow for a bit when I needed to. And the four-wheel works wonders through snow and slush. In some time shortly, I'll have to pull the carb off and clean it up properly (engine runs rich and tends to flood out when it's put into gear). After that is cleaning up the top and interior and she should be pretty good after that. Next project on the line is my late father's 1973 BMW model 2002. I'll be making a thread in the euro car section of the forum when I get started.

-
As of yesterday, here she is on the road at last. Come spring I'll pull her off to clean up interior work.

-
I know it's been a while since I last updated on here, but here's the news. The title was transferred, and then immediately sent out for corrections (it came in titled aa a trailer). Two weeks later, it was sent back out (still... titled as a trailer). Got it in corrected, this time, around beginning of January. Sent her out to have the glass put in the rear quarters of the top and swapped the lift gate for a good one. New tires and in a few days, mirrors.
-
Well, with some help from the guys over in the ford forum, the carb's vacuum issues seem to be sorted out. Gauges are reading true, and the horn button now works. Just waiting on the updated title to come in for the final bits.
-
Well I feel dumb. I tried to move the vac advance to the hiding port (under the fuel pot) and plugged the other one up. Fired right up without the slightest of hesitation. No back fires, no stalls, and no rough idle. Thanks is for all the help though guys!
-
Thanks Matt. Still runs a little rough though. I think the springs on the jet screws are stopping them from closing just enough (back fires when I tap the throttle to I'm assuming it's running rich from that or has a major vacuum leak stopping the air from getting in properly). I'm gonna try and take them out to see if setting them in closer is gonna be better. It seems to idle pretty low as well but I need a temporary tac to see how fast it spins at idle.
-
I also forgot about the little vac port under the accelerator pump
-
Kinda made a choke stove (I think) by running some steel line into the pre-heater shroud (pre-heater dosen't work anyway)


-
Thanks for your help guys. I'm going to try to fab up a choke stove and see if that'll work better (otherwise, I found an adapter kit to make it into a manual choke). I'll sum up what happened up to this moment for you (you might cringe). Grabbed a carb from a junkyard on the sole reasoning that it was the only one I found that was a 2bbl that fit the bolt measurements to-a-tee. It fit, however, the gooseneck pushed the accelerator lever (the Holley 2210 has the lever on the side so this wouldn't happen) causing the truck to go full tilt. I ground down the lever arm so it would fit better and moved the hook to the back side of the set arm (on the butterfly mechanism by the throttle cable). Now you might've found a couple sins, but trust me... it gets worse. Now, it's a good thing (is it though?) that jeep was the bastard child of ford and chevy, because the pressure valve (from the driver-side valve cover) plumbs directly into the jeep aircleaner housing (like the 80s impalas). In short, it runs, but not well. It'll idle fine but it backfires on warmup, and starves itself on startup. If I drop it into gear, the slight drop of rpms stalls it without a little coaxing. I'll get more pics and a diagram soon.
-
So I have an international scout 2. But when I picked it up, there was no carb. I spent a few hours at a junkyard and pulled one off of a 70s ford pickup (small v8 2wd auto, dont remember much else). The only markings on the carb are the "motorcraft" logo and the raised number "10". In short, 15 year-old me grabbed the first carb that bolted up, and now 22 year-old me needs help with some vacuum port connections and the choke's temp tube. Here's what I got Open vac port above the fuel intake (pic 1) Open vac port below aircleaner housing (bypasses filter, pic 2) And a large pledged vac port near the manifold (also pic 2. Although, if it's for the power booster, then mine comes directly from the manifold) Choke temp tube (I think?, pic 3 screwdriver pointed to it) Any help is appreciated. Thanks guys.


-
Just fixed the ammeter gauge and alternator wiring (I originally put a power wire from the battery to the fuse box not realizing it should pass through the ammeter and alternator first.) so now it's on to double checking my temp/press./fuel gauge fuse and wiring connections. After that is tires, bumpers, mirrors, and hopefully an inspection. Come spring I'll take the top back off to clean up and properly paint and upholster.
-
Well, my brother and I spent a couple hours getting the top from my grandfather's garage and bringing it back here. And my lovely lady helped with mounting it. Getting close. Also, the shifter is working clean and smooth now.


-
So paint is done... but now there's another problem. I was working on welding my seat risers back together, when I decided to hook up the shifter lever (I wanted to install that before the seats anyway). everything buttoned up just fine until I attempted to shift it into gear. The lever refused to move at first, but with just a little added pressure the linkage bent and broke. I've noticed that it is quite harder to put the trans in reverse than it is any other gear (moving the selector on the trans that is. engagement itself is fine). Could this be the new neutral safety switch being installed to tightly? should I try a washer or spacer of sorts? As a side mention, when reverse is selected, my reverse lights turn on and then blink off in just a second. I suspected a melted wire or incorrect fuse was the culprit but now I have suspicions of the switch. All help is appreciated.
-
Getting ready to clear coat today (hopefully) although, as a side note, if anyone has extra mirrors (double mount/ford style) I'd trade you some windows for them. Or just give me a price
-


-
Starting the paint now. Can't wait to see her in a shining Lexington blue coat.

-
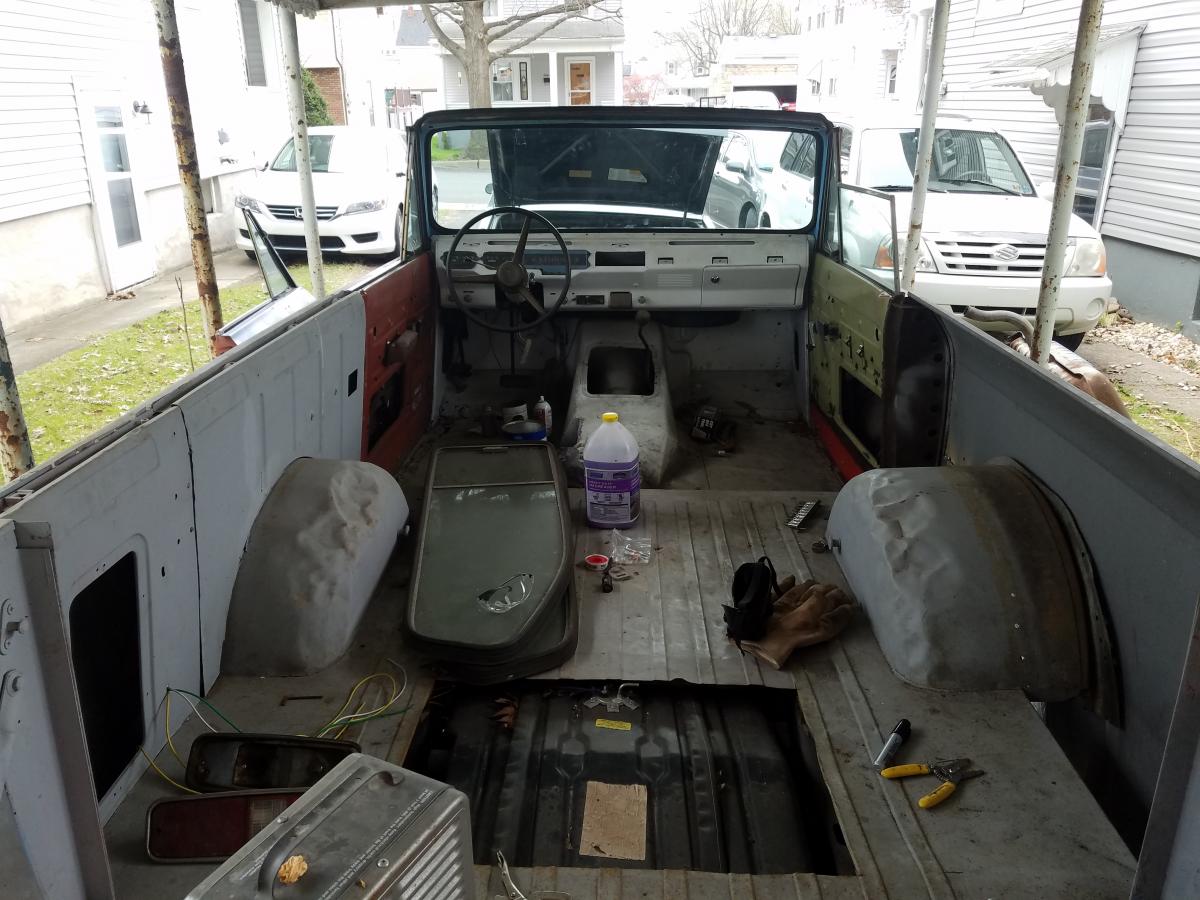
Brakes work and it moves under it's own power! My brother worked the pedals and wheel while I reached down in the tunnel and worked the transmission lever. Now I'm getting ready for primer and paint and then I'll be piecing the interior back together. I'll have pictures soon
-
I'll be double checking all my wiring tomorrow, as well as getting ready for paint if the weather holds up. However, I completely forgot to share a picture of the finished seat. So here it is

-
So I'm pounding my head over electrical here. Books call for a 4A fuse for the gage cluster. Itll work for about a minute and then pop. Is there supposed to be a resistor or something before the fuse block? I dont want to up the fuse size and damage the gauges but an indication of what the engine is doing would be nice. I've got a wire from the column block to a 4A fuse. From there it splits to the alt/fuel and oil/temp gushes. Should both clusters be on separate fuses?
-
I know it's been a while, but I've been hard at work. Electrical is buttoned up (made the harness from scratch), welding is done. Just getting ready for some bondo and hanging the hood and tailgate. All that'll be left is bleeding brakes, tires and paint. I'll have pictures soon.
-
Welded quarter and hung driver door. Windshield needs some minor adjustment to clear the wing windows though. Next is painting the inside of the quarter and welding the inner wall panel. Hopefully I can get that done while bleeding brakes and hanging the hood.

-
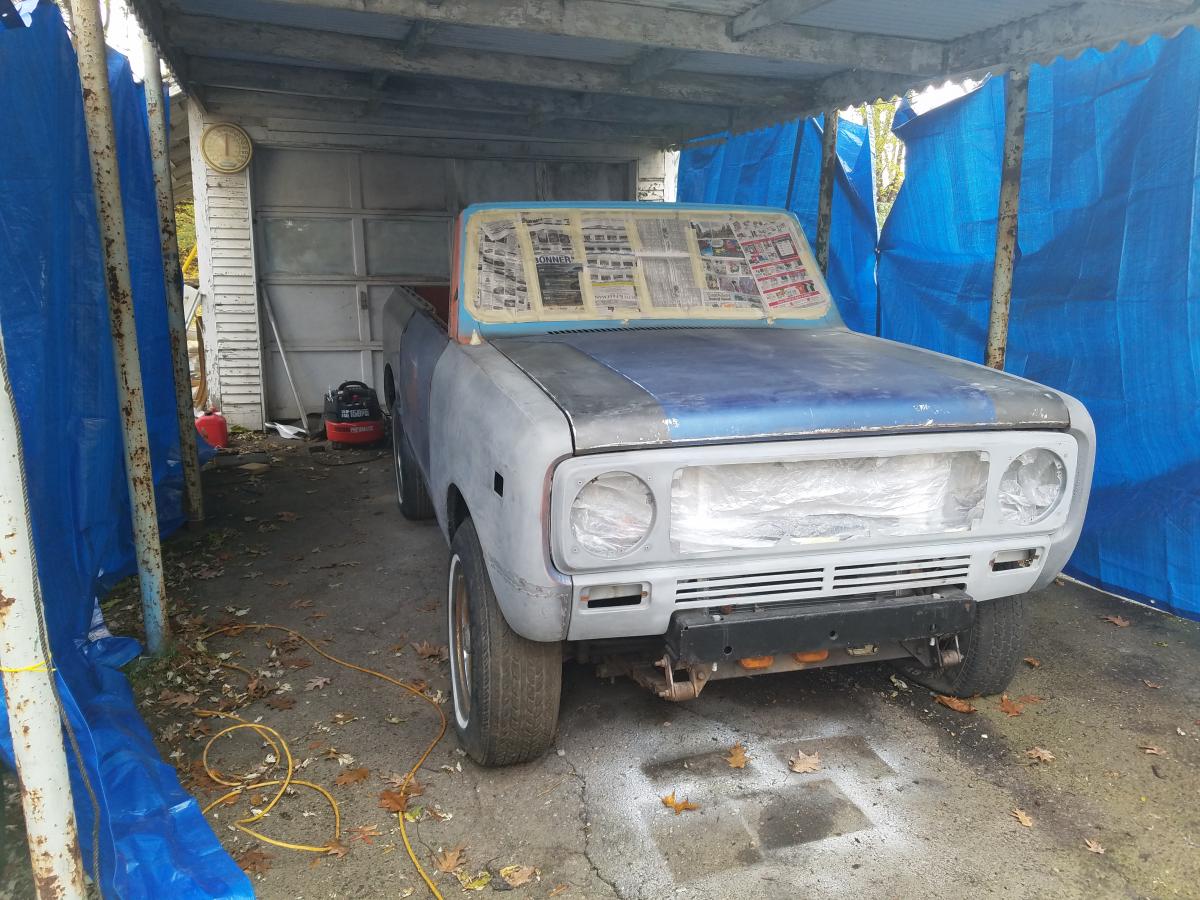
Well if anyone has heard of PA winters then they should know what the hold-up has been. Here's the update: Got a new aluminum radiator from ebay (the old one had a cap with twice the psi rating so the leaks were where the tanks meet the veins). Also got a new windshield and mounted the passenger side door so I can start welding the rear quarter. I also finally ran the brake lines. Lastly, tuned the carb and now she fires up more consistently with less backfiring and stalling. Next is to bleed brakes, weld quarter, hook up trans shifter and linkage, and run fuel lines. Heres the photo (the blue around the frame is the original Lexington blue that I'm going to be painting it)

-
Jut took my radiator to a local garage to have it pressure tested and they found an "un-fixable" leak (Yet they're still charging me $35). I guess I'm going to have to teach myself some soldering and take a crack at it.
-
Didn't forget, just didn't have time. finally i have controllable idle. although low idle stalls (Fuel accelleration pump is partly depressed from the goose neck being too close to the carb) It revs fine, and loud! will have updates as it continues
-
Once again I must apologize for the break in work. I had intended to use my '91 toyota celica as my daily while the Impala got much needed work. However, the toyota is having some troubles that are being worked out and getting back and fourth to work is just a little more important that restoring a truck. The scout was moved back to my house to be finished. I intend to finish the wiring, upholstery, and body work, and then take it to a garage to get a tune up, tires, and a windshield. I'll let you know when I get back under the hood. (of this project that is... god I hate computers and fuel injection)